
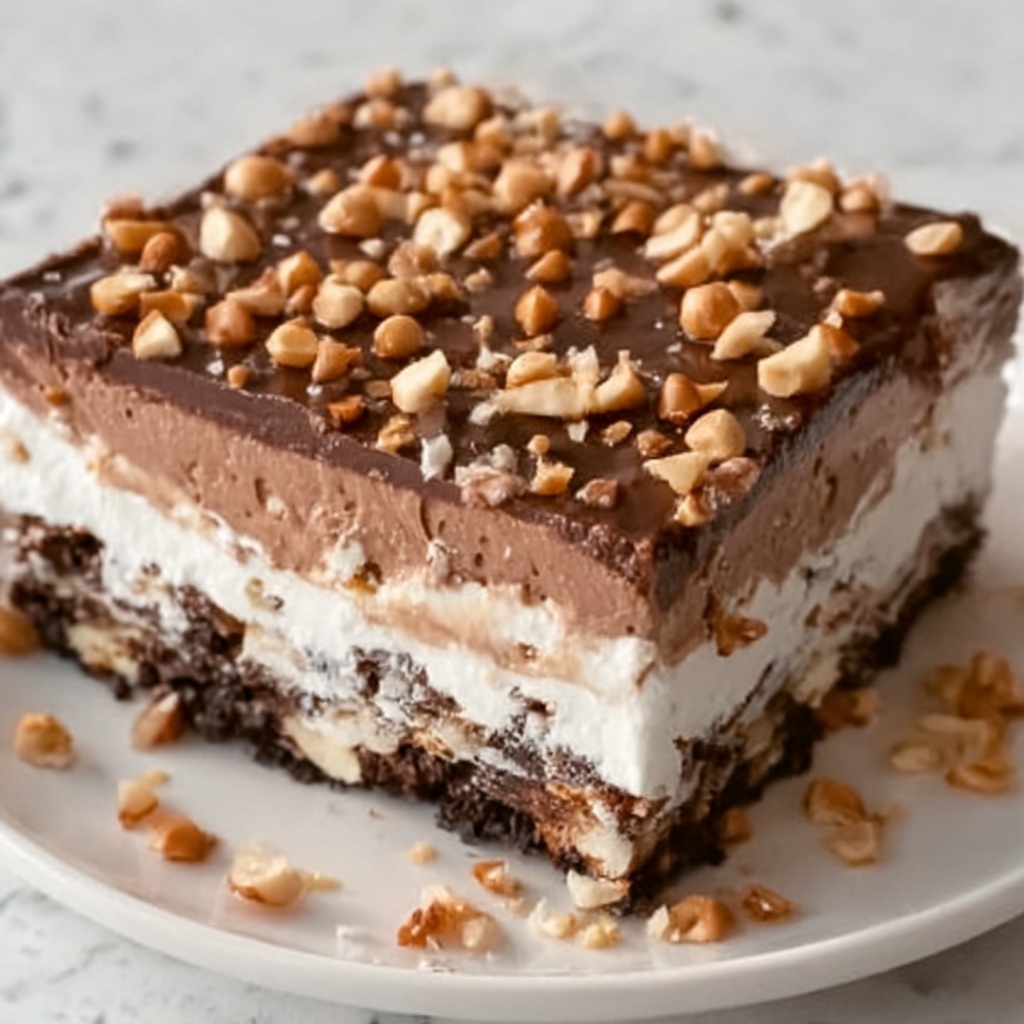
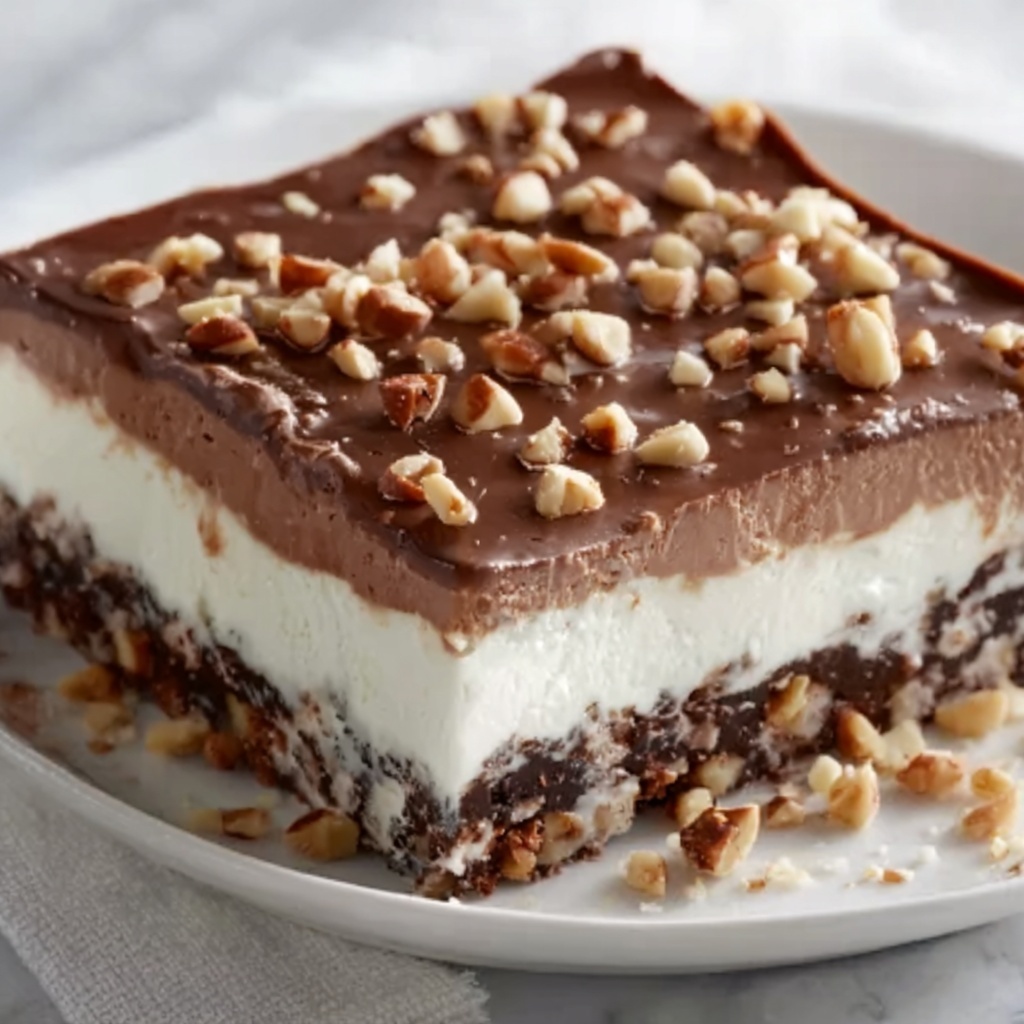
If you’ve been dreaming of a dessert that combines creamy, crunchy, chocolatey, and caramel sensations all in one delightful bite, then you absolutely must try this Buster Bar Ice Cream Cake Recipe. It’s a nostalgic treat reinvented into an easy-to-make frozen cake that impresses every time you bring it to the table. Perfect for warm afternoons or anytime you crave that perfect balance of flavors and textures, this recipe is a guaranteed crowd-pleaser that feels both indulgent and playful.
Ingredients You’ll Need
These ingredients are simple, familiar, and come together beautifully to create a layered masterpiece of flavor and texture. Every element plays a crucial part: from the creamy ice cream sandwiches acting as the base, to the rich chocolate-peanut-caramel topping adding that irresistible crunch and sweetness.
- Ice cream sandwiches: These serve as the foundational layer, providing a cool and creamy base with a chocolate cookie edge that’s just perfect.
- Chocolate chips: Essential for melting into a smooth, glossy chocolate layer that binds the peanuts and caramel.
- Unsalted butter: Helps meld the chocolate perfectly, adding richness and a silky texture.
- Chopped peanuts: Bring a crunchy, nutty contrast that lifts the entire cake.
- Caramel sauce: Drizzled on top to inject a luscious, buttery sweetness that balances the chocolate.
- Vanilla ice cream: The final soft layer that seals the cake with creamy indulgence.
How to Make Buster Bar Ice Cream Cake Recipe
Step 1: Prepare the Ice Cream Sandwich Base
Begin by lining a 9×13-inch baking dish with a single layer of ice cream sandwiches. This base creates a cool, sturdy foundation for your cake and makes assembly a breeze. Make sure the sandwiches fit snugly without gaps, so every slice holds together beautifully.
Step 2: Melt the Chocolate and Butter
Gently melt the butter with the chocolate chips, either in short bursts in the microwave or over a double boiler on the stove. Stir until the mixture is completely smooth and glossy. This rich chocolate layer will act as a decadent glue binding the peanuts and caramel to the ice cream sandwiches beneath.
Step 3: Layer on the Chocolate Mixture
Pour the melted chocolate mixture evenly over the arranged ice cream sandwiches, spreading it gently with a spatula if needed. This helps create a rich, flavorful layer that hardens slightly in the freezer, locking in taste and texture.
Step 4: Sprinkle Chopped Peanuts
Generously scatter the chopped peanuts over the warm chocolate layer. The nuts add an essential crunch and a toasty flavor contrast that elevates this dessert from good to unforgettable.
Step 5: Drizzle Caramel Sauce
Next, drizzle caramel sauce evenly over the peanuts. This buttery sweetness perfectly complements the slight saltiness of the nuts and intensifies the cake’s overall depth of flavor.
Step 6: Add the Vanilla Ice Cream Layer
Top your creation with softened vanilla ice cream, smoothing it out to cover the caramel and peanuts fully. This creamy final layer gives the cake its cool finish and balances the richness below.
Step 7: Freeze Until Firm
Place the cake in the freezer for at least 4 hours, or until completely firm. This chilling step is crucial so that every element sets properly and the cake slices cleanly without melting or falling apart.
Step 8: Serve and Enjoy
Once frozen solid, cut into squares and serve immediately. Each slice delivers a symphony of textures and flavors that will have everyone singing your praises for sharing this delicious Buster Bar Ice Cream Cake Recipe.
How to Serve Buster Bar Ice Cream Cake Recipe
Garnishes
Adding a few thoughtful garnishes can elevate this ice cream cake from delightful to sensational. Fresh whipped cream is a classic favorite, adding lightness to every bite. For a bit of extra flair, sprinkle some extra chopped peanuts or even a drizzle of caramel on top before serving.
Side Dishes
This cake stands beautifully on its own, but if you’re hosting a dessert spread, consider serving it alongside fresh berries or a small scoop of tart sorbet. The fruit’s brightness complements the rich layers and cleanses the palate between bites.
Creative Ways to Present
For a fun twist, try making individual mini cakes in small glass dishes using the same layers. Alternatively, use decorative plating with swirls of caramel sauce and chocolate shards to impress friends and family with your dessert artistry.
Make Ahead and Storage
Storing Leftovers
If you happen to have leftovers, cover the cake tightly with plastic wrap or aluminum foil and store it in the freezer. This keeps the cake fresh and prevents freezer burn, so you can enjoy it again later without losing any of those amazing textures and flavors.
Freezing
This Buster Bar Ice Cream Cake Recipe is a perfect freezer-friendly dessert. Feel free to prepare it days in advance, as freezing actually helps meld the flavors together and maintain that perfect firmness when you’re ready to serve.
Reheating
Since it’s an ice cream cake, reheating is not recommended. Instead, to soften slightly before serving, just leave the cake at room temperature for 5 to 10 minutes before slicing for easy, clean pieces.
FAQs
Can I use different types of ice cream sandwiches?
Absolutely! While the classic chocolate ice cream sandwiches work best for their texture and flavor, feel free to experiment with other flavors like mint or caramel if you want a unique twist on the original Buster Bar Ice Cream Cake Recipe.
Is it okay to substitute peanuts with another nut?
Yes, you can swap peanuts for almonds, pecans, or walnuts depending on your preference or dietary needs. Just be mindful of how the flavor and crunch may change the overall experience.
Can I make this cake dairy-free or vegan?
Definitely! Use dairy-free ice cream sandwiches and vegan butter alternatives, plus dairy-free chocolate chips and caramel sauce to create a deliciously inclusive version of the Buster Bar Ice Cream Cake Recipe.
How long can I keep the cake in the freezer?
For best taste and texture, enjoy your cake within 1 to 2 weeks of freezing. Beyond that, the ice cream may develop freezer burn or changes in flavor.
Can I prepare this recipe without the caramel sauce?
If caramel isn’t your favorite, you can either omit it or replace it with fudge sauce or peanut butter drizzle. These options still deliver that rich, gooey texture essential to the Buster Bar Ice Cream Cake Recipe experience.
Final Thoughts
This Buster Bar Ice Cream Cake Recipe has quickly become one of my personal favorites for good reason—it’s nostalgic, easy to make, and endlessly satisfying. Whether you’re hosting a summer party or looking for a fun family dessert, this cake hits every sweet spot. Trust me, once you try it, you’ll be hooked and ready to make it again and again!
Print
Buster Bar Ice Cream Cake Recipe
- Prep Time: 15 minutes
- Cook Time: 5 minutes
- Total Time: 4 hours 20 minutes
- Yield: 12 servings
- Category: Dessert
- Method: No-Cook
- Cuisine: American
Description
This Buster Bar Ice Cream Cake is a decadent, no-bake dessert combining layers of ice cream sandwiches, rich chocolate, crunchy peanuts, and luscious caramel. Perfect for parties or a summer treat, it requires minimal preparation and freezes to a firm, sliceable cake bursting with flavors and textures reminiscent of the classic candy bar it’s named after.
Ingredients
Base Layer
- 1 box of ice cream sandwiches (about 10–12 sandwiches)
Chocolate Topping
- 2 cups chocolate chips
- 1/4 cup unsalted butter
Nutty & Caramel Layers
- 1 cup peanuts, chopped
- 1/2 cup caramel sauce
Top Layer
- 2 cups vanilla ice cream
Instructions
- Prepare the base: Line a 9×13-inch baking dish evenly with ice cream sandwiches, ensuring the surface is fully covered to form a solid base for the cake.
- Melt the chocolate mixture: Combine the chocolate chips and unsalted butter in a microwave-safe bowl or a small saucepan. Heat in intervals, stirring until the mixture is completely melted and smooth. Pour this warm chocolate mixture evenly over the arranged ice cream sandwiches, spreading gently if needed.
- Add peanuts: Sprinkle the chopped peanuts uniformly over the melted chocolate layer, adding a crunchy texture that complements the creaminess.
- Drizzle caramel sauce: Evenly drizzle the caramel sauce over the peanut topping, creating a sticky, sweet layer that enhances richness.
- Top with vanilla ice cream: Soften the vanilla ice cream slightly to make it spreadable, then add it as the final layer on top. Use a spatula to smooth out the surface for an even finish.
- Freeze until firm: Place the entire cake in the freezer and chill for at least 4 hours, or until the layers are solid and the cake can be easily cut.
- Serve: Once fully frozen, cut the cake into squares and serve cold for a refreshing, indulgent dessert.
Notes
- For easier slicing, let the cake sit at room temperature for a few minutes before cutting.
- You can substitute peanuts with other nuts such as almonds or pecans depending on your preference.
- If caramel sauce is thick, gently warm it to make drizzling easier.
- Use softened ice cream to create a smooth top layer without cracking.
- This cake needs to be kept frozen until serving to maintain its shape and texture.
