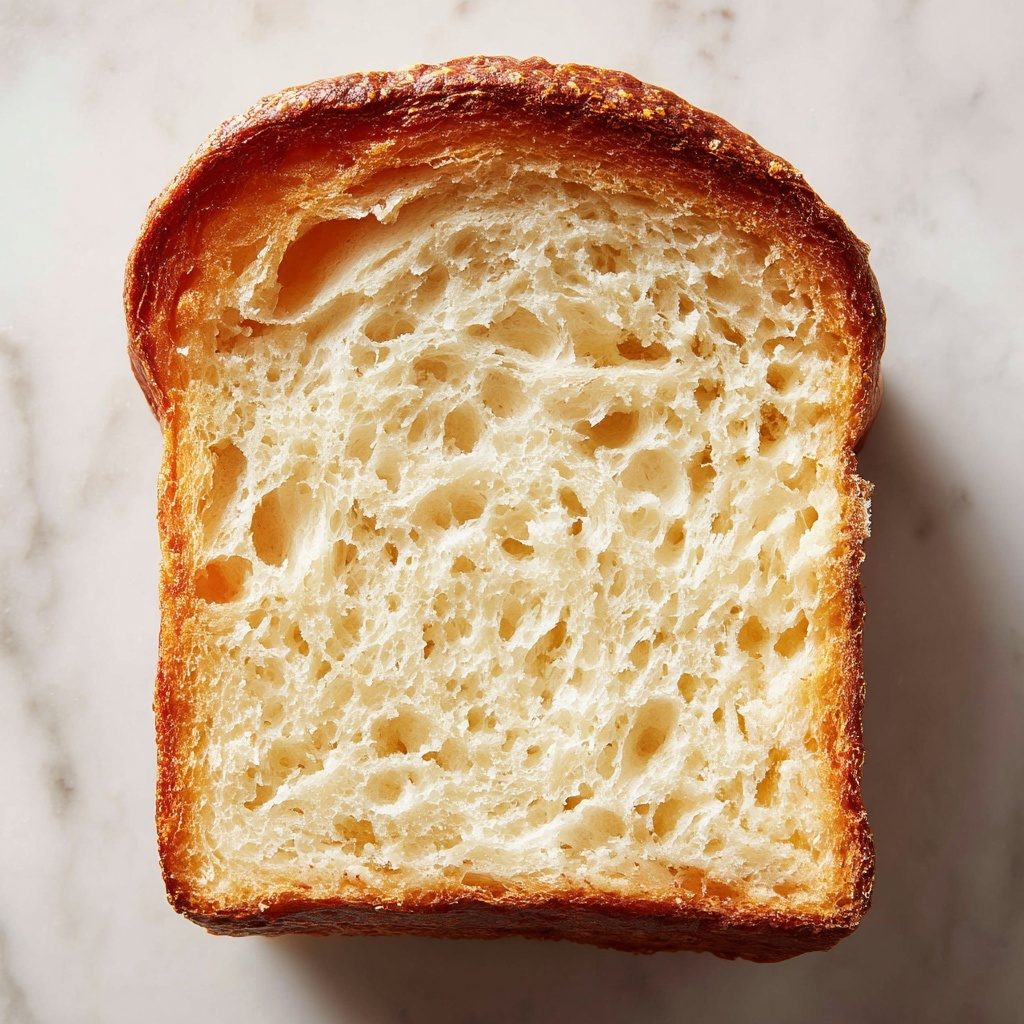
If you have ever wished for a homemade bread that’s soft, fluffy, and beautifully golden yet fits perfectly into a gluten-free lifestyle, then this Classic Gluten-Free White Sandwich Bread Recipe is your new best friend. It’s a simple, inviting loaf that fills your kitchen with the warm aroma of fresh bread and delivers that familiar, comforting flavor and texture you crave—without any gluten worries. Whether you’re slicing it for sandwiches, toasting it for breakfast, or simply nibbling it straight from the loaf, this recipe promises a reliably delicious result every single time.
Ingredients You’ll Need
Getting the right ingredients for this Classic Gluten-Free White Sandwich Bread Recipe is actually surprisingly straightforward. Each item plays a vital role: from the gluten-free flour that forms the base of your loaf to the yeast that creates that perfect rise, every component is essential to making this bread shine.
- Gluten-free all-purpose flour: The foundation of your bread, providing structure without gluten.
- Sugar: Just a touch to feed the yeast and enhance browning of the crust.
- Salt: Balances flavors and strengthens the dough’s texture.
- Active dry yeast: The magical ingredient that makes your bread rise with a light, airy crumb.
- Warm water: Activates the yeast and brings the dough together smoothly.
- Olive oil: Adds moisture and a tender crumb with a subtle richness.
- Eggs: Bind ingredients, enrich flavor, and contribute to the bread’s soft texture and golden color.
How to Make Classic Gluten-Free White Sandwich Bread Recipe
Step 1: Preheat and Prepare
Start by setting your oven to 375°F (190°C) so it’s perfectly heated by the time your dough is ready. Greasing a loaf pan helps ensure your bread releases easily after baking, so don’t skip this simple but crucial step.
Step 2: Mix Dry Ingredients
In a large bowl, whisk together your gluten-free all-purpose flour, sugar, salt, and active dry yeast. This mix is where the foundation begins, and evenly combining these dry elements ensures the yeast and salt are well distributed, giving your bread an even rise and balanced taste.
Step 3: Add Wet Ingredients
Next, pour in the warm water, olive oil, and eggs. Warm water is key because it wakes up the yeast gently—too hot and it might kill it, too cold and it won’t activate fully. Mix everything until the dough looks smooth and comes together nicely. It won’t be quite like traditional wheat dough, naturally a bit more delicate, but don’t worry, it’s just right.
Step 4: Transfer and Shape
Carefully spoon the dough into your greased loaf pan and smooth the top with a spatula. This ensures a nice even surface for baking, leading to that classic sandwich loaf shape everyone loves. It may look a bit thick, but gluten-free bread dough is meant to be this consistency.
Step 5: Bake to Perfection
Pop the pan into the oven and bake for 40 minutes. You’ll know it’s done when the crust turns a beautiful golden brown and tapping the bottom of the loaf gives you a hollow ring—a traditional way to test doneness that works perfectly here too.
Step 6: Cooling is Key
Once baked, allow your bread to cool in the pan for 10 minutes to firm up. Then gently transfer it to a wire rack to cool completely. This step lets the crumb set properly and makes slicing much easier, so don’t be tempted to jump in right away.
How to Serve Classic Gluten-Free White Sandwich Bread Recipe

Garnishes
This bread is charming on its own, but you can take it up a notch with a light brush of butter or olive oil while it’s still warm. Sprinkling herbs like rosemary or thyme can add a lovely fragrant touch that pairs beautifully with savory sandwiches.
Side Dishes
Pair your slices with a vibrant bowl of soup, creamy avocado spread, or a colorful salad. The mild, soft texture of this sandwich bread complements a variety of flavors seamlessly, making it a versatile companion to many meals.
Creative Ways to Present
For a fun twist, toast slices and then top them with smashed chickpeas and garlic-infused olive oil or create mini open-faced sandwiches with smoked salmon and dill. You can even cut the loaf into thick slices and use them for grilled cheese masterpieces that everyone will adore.
Make Ahead and Storage
Storing Leftovers
Once cooled completely, wrap your Classic Gluten-Free White Sandwich Bread Recipe tightly in plastic wrap or place it in an airtight container. It’ll keep fresh for about 2 to 3 days at room temperature, perfect for making sandwiches or toast throughout the week.
Freezing
If you want to keep your bread longer, freezing is a great option. Slice before freezing for convenience, then wrap in foil or freezer bags. You can store it for up to 3 months without losing the delicious texture and flavor.
Reheating
To bring back that fresh-baked warmth, simply toast slices directly from the freezer or warm whole loaves wrapped in foil at 350°F (175°C) for 10 to 15 minutes. The bread regains its delightful softness and aroma with minimal effort.
FAQs
Can I substitute olive oil with another oil?
Absolutely! You can use vegetable oil, melted coconut oil, or even avocado oil. Just remember each oil will subtly change the flavor and texture, but all work well to keep your bread moist and tender.
Do I need a special gluten-free flour for this recipe?
Yes, it’s important to use a gluten-free all-purpose flour blend that contains xanthan gum or another binder. This helps mimic the elasticity of gluten and ensures your bread holds together nicely.
Can I make this bread dairy-free?
This recipe is naturally dairy-free since it uses olive oil and eggs. Just be sure your gluten-free flour blend doesn’t contain dairy-based additives.
What if my bread doesn’t rise properly?
Check that your yeast is fresh and your water temperature is warm, not hot or cold. Also, mixing ingredients well and giving your bread time to cool fully before slicing helps improve texture and rise.
How do I make this bread vegan?
You can substitute the eggs with flax eggs (1 tablespoon ground flaxseed mixed with 3 tablespoons water per egg, allowed to gel for a few minutes). Keep in mind the texture might be slightly denser but still delicious.
Final Thoughts
There’s nothing quite like the joy of slicing into a warm, homemade loaf of bread that’s both classic and caters to your gluten-free needs. This Classic Gluten-Free White Sandwich Bread Recipe is easy, forgiving, and wonderfully satisfying. Whether you’re new to gluten-free baking or looking to perfect a reliable staple, I cannot recommend giving this recipe a try enough—it’s the kind of bread that makes every meal a little bit better.
Print
Classic Gluten-Free White Sandwich Bread Recipe
- Prep Time: 15 minutes
- Cook Time: 40 minutes
- Total Time: 55 minutes
- Yield: 1 loaf (about 8 slices)
- Category: Bread
- Method: Baking
- Cuisine: American
- Diet: Gluten Free
Description
This Classic White Sandwich Bread recipe is a gluten-free twist on traditional homemade bread, delivering a soft, fluffy loaf perfect for sandwiches. Made with gluten-free all-purpose flour and enriched with eggs and olive oil, this bread offers a tender crumb and golden crust, baked to perfection in just under an hour.
Ingredients
Dry Ingredients
- 2 cups gluten-free all-purpose flour
- 1 tablespoon sugar
- 1 teaspoon salt
- 1 tablespoon active dry yeast
Wet Ingredients
- 1 cup warm water
- 2 tablespoons olive oil
- 2 eggs
Instructions
- Preheat and prepare: Preheat your oven to 375°F (190°C) and grease a loaf pan to ensure the bread doesn’t stick during baking.
- Mix dry ingredients: In a large mixing bowl, combine the gluten-free all-purpose flour, sugar, salt, and active dry yeast, ensuring they are evenly distributed.
- Add wet ingredients: Pour in the warm water, olive oil, and eggs to the dry ingredients. Mix thoroughly until a smooth, cohesive dough forms, suitable for gluten-free bread baking.
- Transfer dough to pan: Spoon the dough into the prepared loaf pan, smoothing the top with a spatula to create an even surface for uniform baking.
- Bake: Place the loaf in the oven and bake for 40 minutes, or until the bread develops a golden brown crust and sounds hollow when tapped on the bottom, indicating it is fully baked.
- Cool: Remove the bread from the oven and allow it to rest in the pan for 10 minutes before transferring it onto a wire rack to cool completely, which helps the bread set and prevents sogginess.
Notes
- Ensure the water is warm—not hot—to activate the yeast without killing it.
- Use gluten-free all-purpose flour suitable for bread for the best texture.
- Let the bread cool completely before slicing to prevent crumb collapse.
- Store bread in an airtight container to maintain freshness for up to 3 days.


