
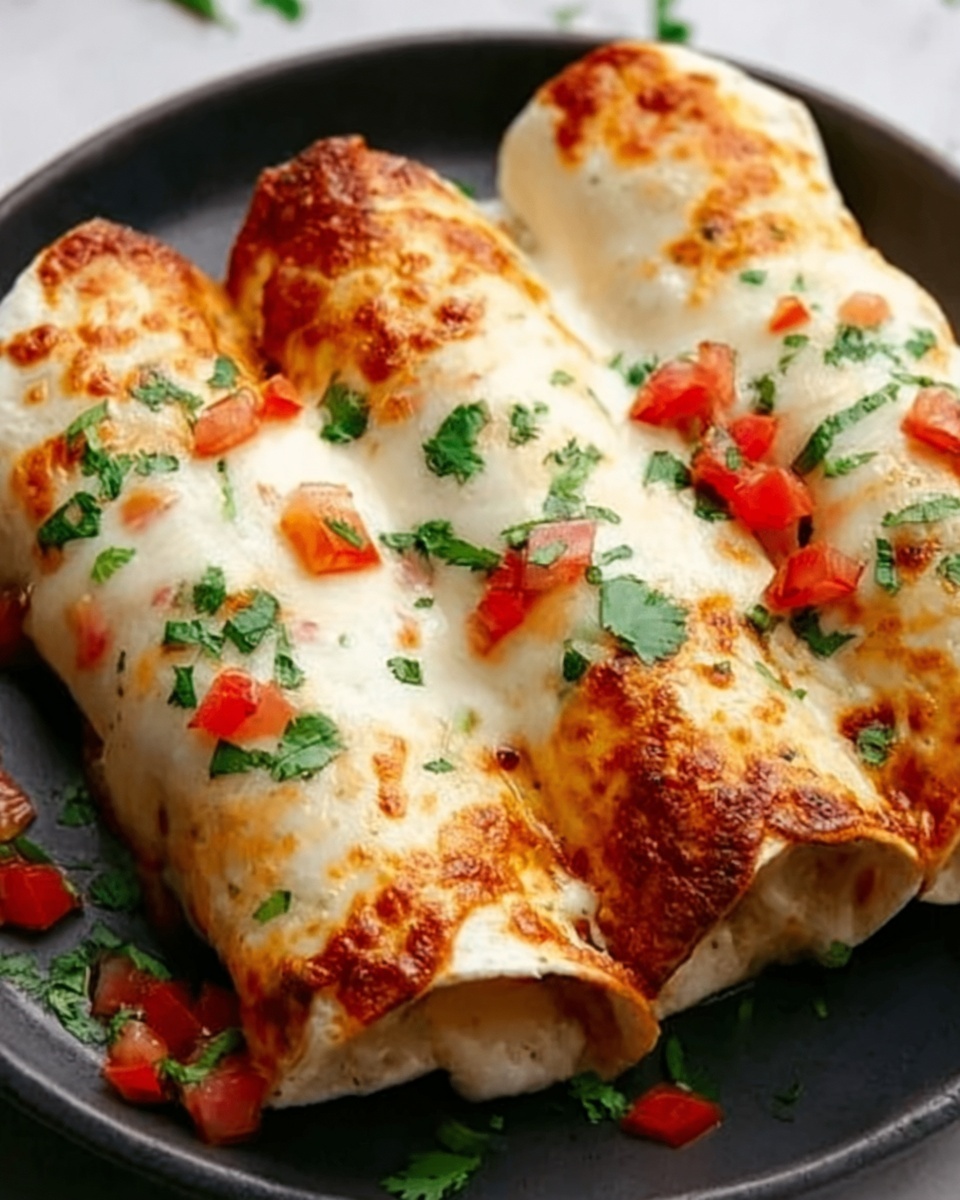
If you’re craving a dish that combines the crispy charm of chimichangas with the ease of baking, you’ve just landed on a winner. This Baked Chicken Chimichangas: Easy and Delicious Recipe is a fantastic twist on a classic favorite, offering all the melty cheese, zesty seasoning, and tender chicken you love without the mess and fuss of frying. It’s the perfect weeknight dinner that’s both simple to prepare and irresistibly satisfying, making it a go-to for families and casual dinner parties alike.
Ingredients You’ll Need
The beauty of this recipe lies in its straightforward and accessible ingredients. Each component plays a key role, from the creamy cheese blend that keeps the filling rich and gooey, to the taco seasoning that infuses bold, festive flavor. These ingredients are easy to find yet come together in a way that’s full of color, texture, and mouthwatering taste.
- Cream cheese (8 oz): Adds a smooth, creamy base that binds the filling perfectly.
- Pepperjack cheese, shredded (8 oz): Provides a spicy kick and melty texture.
- Taco seasoning (1 1/2 tbsp): Packs a flavorful punch that turns simple chicken into a fiesta in every bite.
- Cooked chicken, shredded (1 lb): The hearty, protein-loaded star that makes this dish truly satisfying.
- Flour tortillas (8): Soft, pliable wraps that crisp up beautifully in the oven.
- Cooking spray: Ensures a golden, crunchy exterior without the fuss of frying.
- Shredded cheddar cheese (for garnish): Adds an extra cheesy layer and a pop of color when served.
- Green onions (for garnish): Fresh, mild bite that brightens up the dish.
- Sour cream and salsa (for serving): Classic topping duo that cools and complements the spicy filling.
How to Make Baked Chicken Chimichangas: Easy and Delicious Recipe
Step 1: Mix the Cheeses and Seasoning
Start by blending the cream cheese, shredded Pepperjack cheese, and taco seasoning. Stir them together until you get a smooth, well-incorporated mixture. This blend creates a creamy, flavorful filling that will envelop every bite and keep things delightfully cheesy.
Step 2: Add Chicken
Next, fold the shredded cooked chicken into your cheese and seasoning mix. Make sure the chicken evenly coats in the cheesy, spicy goodness. This step ensures every forkful delivers a balanced taste of tender chicken and rich, seasoned cheese.
Step 3: Fill and Roll
Lay out your flour tortillas on a clean surface, then divide the chicken mixture evenly among them. Tuck in the sides carefully and roll them up tightly so that the filling stays secure during baking. This method brings that classic chimichanga shape and keeps all the flavors locked inside.
Step 4: Bake
Preheat your oven to 350°F (175°C) and lightly spray a 9×13-inch baking dish with cooking spray. Place the rolled chimichangas seam side down to prevent them from opening up while baking. Give the tops a light spray as well — this little trick helps them crisp up gorgeously. Bake for 15 minutes, flip carefully, then bake for another 15 minutes until they turn golden brown and crispy on both sides.
Step 5: Serve
Once beautifully baked, remove the chimichangas from the oven and sprinkle with shredded cheddar cheese and sliced green onions. Serve with sides of sour cream and salsa for dipping. The final touches bring contrast and freshness to round out this irresistible meal.
How to Serve Baked Chicken Chimichangas: Easy and Delicious Recipe

Garnishes
Simple garnishes make a huge impact with these chimichangas. Shredded cheddar cheese adds a rich, colorful layer, while green onions provide a vibrant crispness that balances the richness of the filling. A generous dollop of sour cream gives a cooling creaminess against the spicy notes, and salsa adds a zesty, tangy finish that livens up every bite.
Side Dishes
Complement your chimichangas with light and fresh side dishes like a crisp garden salad or a tangy Mexican corn salad. Classic Mexican rice or refried beans also pair beautifully, creating a hearty meal without overwhelming the dish’s signature flavors. A side of guacamole or fresh pico de gallo can provide bursts of freshness that elevate the experience even more.
Creative Ways to Present
Looking to impress your guests? Serve your baked chimichangas with a colorful array of dipping bowls containing sour cream, salsa, guacamole, and even a spicy chipotle sauce. For a festive touch, place chimichangas on a bed of shredded lettuce, garnished with sliced olives and chopped cilantro. Cutting them in half on the diagonal also makes for an appealing presentation and shows off the gooey filling inside.
Make Ahead and Storage
Storing Leftovers
If you have any leftover baked chicken chimichangas, let them cool to room temperature first, then place them in an airtight container. They will keep well in the refrigerator for up to 3 days. This makes for an excellent next-day lunch or easy dinner that reheats beautifully.
Freezing
You can freeze the chimichangas before baking for convenient future meals. Wrap each rolled chimichanga tightly in plastic wrap or foil and place in a freezer-safe bag or container. They will keep well for up to three months. Just bake them directly from frozen, adding extra baking time to ensure they’re heated through and crisp outside.
Reheating
For the crispiest results, reheat leftovers in the oven at 350°F (175°C) for about 10-15 minutes, flipping halfway through. This brings back the golden crust and warms the filling evenly. Microwave heating is faster but may soften the exterior, so it’s best as a last resort when you’re short on time.
FAQs
Can I use different types of cheese in this recipe?
Absolutely! While Pepperjack cheese adds a nice spicy touch, you can swap it with Monterey Jack, mozzarella, or even a sharp cheddar for different flavor profiles. Just aim for cheeses that melt well.
Is it necessary to cook the chicken before adding it?
Yes, definitely. Using cooked shredded chicken ensures the filling is ready to eat after baking. If you use raw chicken, it won’t cook fully in the short baking time, which could be unsafe.
Can I make this recipe vegetarian?
Yes! Simply substitute the shredded chicken with cooked black beans, sautéed vegetables, or a plant-based meat alternative. The cheese and seasoning will still provide plenty of flavor.
How do I know when my chimichangas are done baking?
Look for a golden-brown crispy exterior on both sides after baking. You can also check that the filling is hot and melted by cutting into one carefully.
What’s the best way to prevent the tortillas from getting soggy?
Using cooking spray on the tortillas before baking and turning the chimichangas halfway through helps crisp up the outside and keep them from becoming soggy. Baking seam side down prevents spillage and keeps them nicely sealed.
Final Thoughts
This Baked Chicken Chimichangas: Easy and Delicious Recipe is truly a lifesaver when you want something comforting, cheesy, and packed with flavor without spending hours in the kitchen. It strikes the perfect balance between fuss-free prep and impressive taste, making it a staple you’ll want to keep in your dinner rotation. Give it a try—you might just find your new favorite dinner to share over laughter and good company.
Print
Baked Chicken Chimichangas: Easy and Delicious Recipe
- Prep Time: 15 minutes
- Cook Time: 30 minutes
- Total Time: 45 minutes
- Yield: 8 servings
- Category: Main Course
- Method: Baking
- Cuisine: Mexican
Description
These Baked Chicken Chimichangas are a delicious twist on the classic fried version, featuring a creamy and spicy cheese and chicken filling wrapped in flour tortillas and baked to golden, crispy perfection. Perfect as a satisfying dinner or party appetizer.
Ingredients
Filling
- 8 oz package cream cheese
- 8 oz Pepperjack cheese, shredded
- 1 1/2 tbsp taco seasoning
- 1 lb cooked chicken, shredded
Assembly
- 8 flour tortillas
- Cooking spray
Garnish & Serving
- Shredded cheddar cheese (for garnish)
- Green onions, sliced (for garnish)
- Sour cream (for serving)
- Salsa (for serving)
Instructions
- Mix the Cheeses and Seasoning: In a medium bowl, stir together the cream cheese, shredded Pepperjack cheese, and taco seasoning until the mixture is smooth and well combined.
- Add Chicken: Fold in the shredded cooked chicken evenly into the cheese and seasoning mixture, ensuring the filling is uniformly mixed.
- Fill and Roll: Lay out each flour tortilla flat and evenly divide the chicken and cheese mixture among them. Tuck in the sides of each tortilla and roll them up tightly to form chimichangas.
- Bake: Preheat your oven to 350°F (175°C). Lightly spray a 9×13-inch baking dish with cooking spray. Place the rolled chimichangas seam side down in the dish. Spray the tops lightly with cooking spray to help them crisp up. Bake for 15 minutes, then carefully flip each chimichanga and bake for another 15 minutes until they are golden brown and crispy.
- Serve: Remove the chimichangas from the oven and garnish with shredded cheddar cheese and sliced green onions. Serve hot with sour cream and salsa on the side for dipping.
Notes
- For extra crispiness, you can brush the chimichangas with a little melted butter instead of cooking spray before baking.
- If you prefer a spicier kick, add some chopped jalapeños to the filling mixture.
- Leftover chimichangas can be refrigerated and reheated in the oven to retain their crisp texture.
- Using cooked rotisserie chicken can save preparation time.
- To make this recipe gluten-free, substitute the flour tortillas with gluten-free tortillas.

