
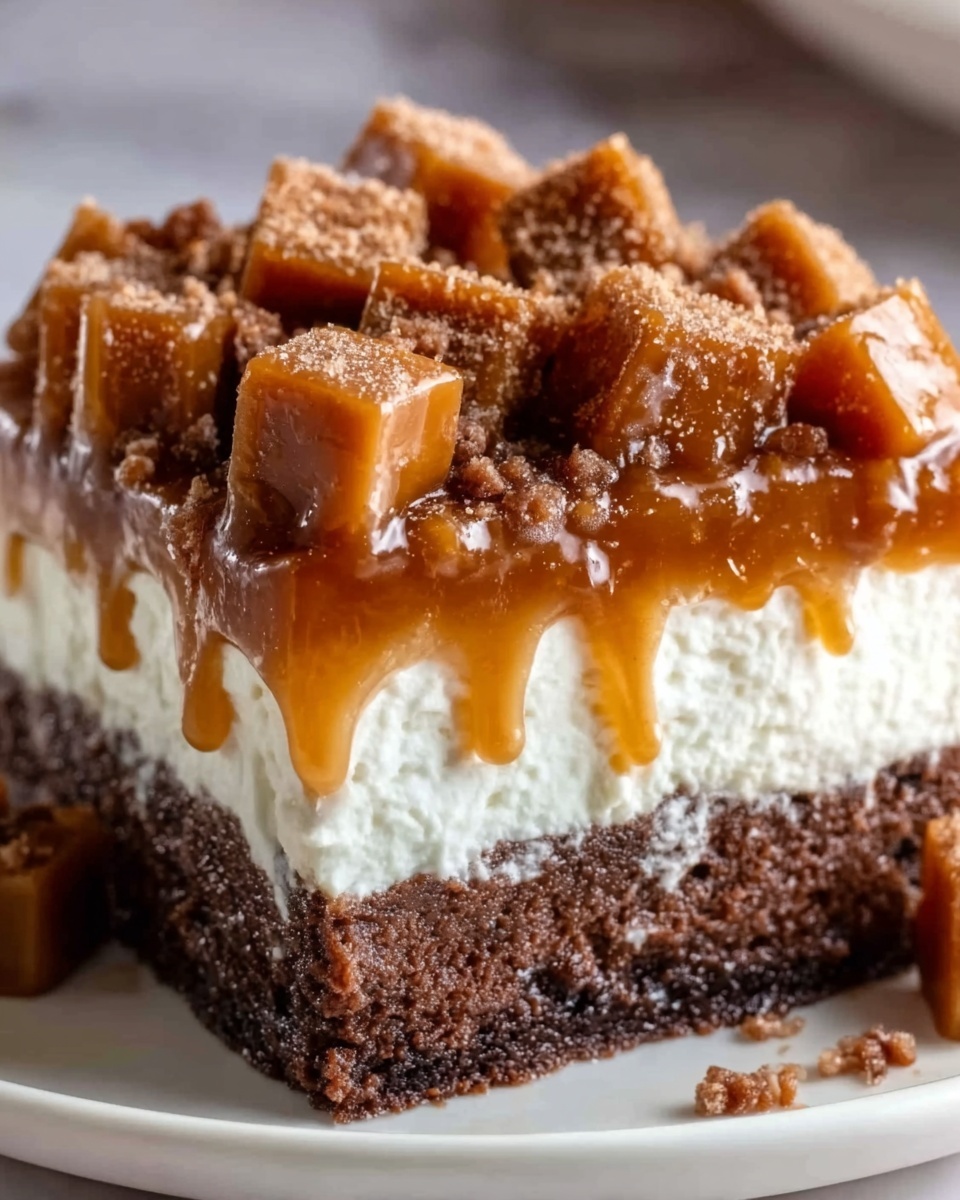
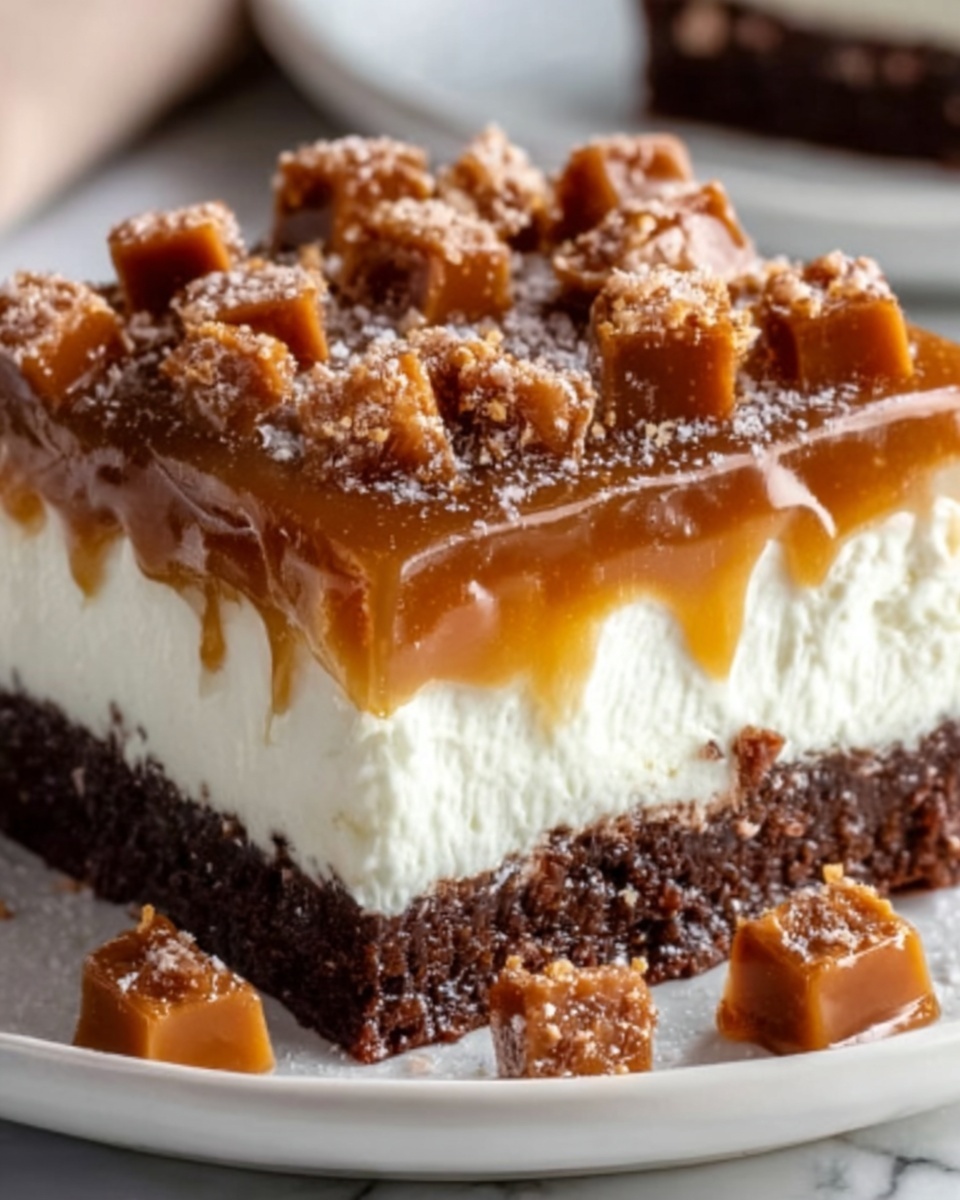
If you are looking to wow your friends and family with a dessert that’s bursting with chocolate, caramel, and that unmistakable Butterfinger crunch, then this Butterfinger Candy Bar Poke Cake Recipe is exactly what you need. It’s an irresistible, fun-to-make creation that combines a moist chocolate cake base with gooey caramel and sweetened condensed milk filling, all topped with fluffy whipped cream and lots of crushed Butterfinger pieces for a delightful finish. Every bite is a celebration of textures and flavors that will quickly make this cake one of your go-to favorites for any occasion.
Ingredients You’ll Need
Gathering the ingredients for this Butterfinger Candy Bar Poke Cake Recipe is delightfully simple, yet each component plays a crucial role in delivering that perfect balance of flavor and texture. From the rich chocolate cake mix to the luscious caramel sauce, everything comes together to create a heavenly dessert experience.
- Chocolate cake mix: The foundation of the cake, ensuring moistness and deep chocolate flavor.
- Eggs, oil, and water: Essentials to bring the cake mix to life with the right crumb and moisture.
- Sweetened condensed milk (14 oz can): Adds a creamy sweetness that seeps into the cake’s holes for extra indulgence.
- Caramel sauce (12 oz jar): Brings a rich, buttery sweetness that complements the chocolate beautifully.
- Whipped topping (8 oz, thawed): The light, airy layer that balances the richness underneath with a cool creaminess.
- Butterfinger candy bars (4-5, crushed): The star ingredient providing that irresistible, crunchy peanut butter and honeycomb texture.
How to Make Butterfinger Candy Bar Poke Cake Recipe
Step 1: Bake the Cake
Start with your favorite chocolate cake mix and prepare it according to the package instructions. Pour the batter into a greased 9×13-inch baking dish and bake until a toothpick comes out clean. Let the cake rest for about 10 minutes – just enough so it’s warm but cool enough to handle.
Step 2: Poke the Cake
Grab the handle of a wooden spoon and poke holes all over the cake’s surface. These holes are essential because they allow the next step’s luscious mixture to soak deep into the cake, making every bite moist and flavorful. Make sure the holes are evenly spaced and wide enough to let the filling seep in properly.
Step 3: Add Caramel and Condensed Milk
Mix the sweetened condensed milk and caramel sauce in a bowl until smooth. Slowly pour this delicious mixture over the entire cake, ensuring it fills all the holes. This creates a decadent, gooey layer inside the cake that perfectly contrasts with the fluffy cake texture. Let the cake cool completely to let the filling set firmly.
Step 4: Top with Whipped Topping
Once cooled, spread the thawed whipped topping evenly across the cake’s surface. This adds a light and creamy layer that complements the dense caramel-infused cake below it. The whipped topping also serves as the perfect glue for the next layer of Butterfinger pieces.
Step 5: Add Crushed Butterfinger
Now for the best part – sprinkle crushed Butterfinger candy bars generously over the whipped topping. These crunchy bits add a sweet peanut buttery crunch that’s signature to this Butterfinger Candy Bar Poke Cake Recipe. The contrast in textures is what makes this dessert truly unforgettable.
Step 6: Chill and Serve
Refrigerate the cake for at least one hour before serving. This chilling step is key as it allows all those incredible flavors to meld together and the cake to fully set, making slices neat and easy to serve. Trust me, the wait is totally worth it!
How to Serve Butterfinger Candy Bar Poke Cake Recipe
Garnishes
To elevate your Butterfinger Candy Bar Poke Cake Recipe even more, consider garnishing with a drizzle of caramel sauce or a handful of chocolate shavings on top. Adding a small scoop of vanilla ice cream on the side brightens up each slice and adds another layer of decadent fun.
Side Dishes
This cake is rich and satisfying on its own, but pairing it with fresh berries or a simple fruit salad can provide a refreshing counterpoint that balances the sweetness perfectly. A cup of coffee or a bold hot chocolate is another excellent companion for serving.
Creative Ways to Present
For a party, try serving this poke cake in individual clear cups or small jars layered with extra crushed Butterfinger on top for a trendy dessert parfait. You can also cut it into bite-sized squares and stick a small fork or toothpick in each for an easy-to-eat finger food dessert that everyone will love.
Make Ahead and Storage
Storing Leftovers
Once made, store your Butterfinger Candy Bar Poke Cake Recipe covered tightly in the refrigerator for up to 4 days. This keeps the cake moist and prevents the crushed candy bars from becoming soggy, preserving the delightful crunch.
Freezing
You can freeze this cake by wrapping it well with plastic wrap and then aluminum foil to protect it from freezer burn. Freeze for up to 2 months. When ready to enjoy, thaw it overnight in the fridge for the best texture and flavor.
Reheating
This cake is best enjoyed chilled, so reheating isn’t recommended. If you prefer a less chilled texture, simply let it sit at room temperature for 15-20 minutes before slicing and serving to soften the whipped topping slightly.
FAQs
Can I use a homemade chocolate cake instead of a mix?
Absolutely! A homemade chocolate cake will work beautifully and might even add a personal touch if you have a favorite recipe. Just make sure it fits the 9×13-inch pan size for similar results.
Are there alternatives to Butterfinger candy bars?
You can experiment with other crunchy candy bars like Heath or Twix, but keep in mind the signature peanut butter and crispy honeycomb texture of Butterfinger is what truly defines this poke cake’s charm.
What if I don’t have caramel sauce? Can I make it from scratch?
Yes, a homemade caramel sauce made with sugar, butter, and cream is a perfect substitute. It adds a lovely fresh flavor if you prefer making it from scratch instead of using store-bought.
How long does it take to prepare the Butterfinger Candy Bar Poke Cake Recipe?
The active preparation and baking time is about 45 minutes, not including the chilling time. Most of the magic happens while the cake cools and chills, so plan ahead for the best results.
Can I make this recipe gluten-free?
Yes, by using a gluten-free chocolate cake mix and ensuring all other ingredients are gluten-free, you can enjoy this dessert without worry. Just double-check the candy bars and sauces for hidden gluten.
Final Thoughts
There’s something so joyful about a poke cake that pools with caramel and sweetened condensed milk, topped with fluffy whipped cream and the crunchy bliss of Butterfinger pieces. This Butterfinger Candy Bar Poke Cake Recipe is a must-try for any dessert lover who appreciates a balance of rich flavors, fun textures, and easy preparation. Once you taste its decadent layers, you’ll find yourself reaching for this recipe again and again — perfect for celebrations, family dinners, or anytime you want to treat yourself and your loved ones.
Print
Butterfinger Candy Bar Poke Cake Recipe
- Prep Time: 15 minutes
- Cook Time: 35 minutes
- Total Time: 1 hour 50 minutes
- Yield: 12 servings
- Category: Dessert
- Method: Baking
- Cuisine: American
Description
This Butterfinger Candy Bar Poke Cake is a decadent chocolate dessert featuring a moist chocolate cake base soaked with a luscious caramel and sweetened condensed milk mixture, topped with creamy whipped topping and crunchy crushed Butterfinger candy bars. Perfect for chocolate lovers who enjoy a rich, layered treat with a delightful combination of textures and flavors.
Ingredients
Cake:
- 1 box chocolate cake mix (plus ingredients listed on the box: eggs, oil, and water)
Filling:
- 1 can (14 oz) sweetened condensed milk
- 1 jar (12 oz) caramel sauce
Topping:
- 1 container (8 oz) whipped topping (like Cool Whip), thawed
- 4–5 Butterfinger candy bars, crushed
Instructions
- Bake the cake: Prepare the chocolate cake according to the package directions and bake it in a 9×13-inch baking dish. Once baked, allow the cake to cool for about 10 minutes to make it easier to handle for the next steps.
- Poke the cake: Using the handle of a wooden spoon, poke holes all over the surface of the cake. Make sure the holes are large enough to allow the filling to seep deeply into the cake layers for maximum flavor absorption.
- Add caramel and condensed milk: In a small bowl, mix the sweetened condensed milk and caramel sauce together until well combined. Pour this mixture evenly over the cake, making sure it fills all the poked holes. Allow the cake to cool completely so the mixture soaks in thoroughly.
- Top with whipped topping: Once the cake has fully cooled, spread the thawed whipped topping evenly over the surface, creating a smooth and creamy layer.
- Add crushed Butterfinger: Crush the Butterfinger candy bars into bite-sized pieces and sprinkle them generously over the whipped topping, adding a crunchy texture and signature candy flavor to the cake.
- Chill and serve: Refrigerate the cake for at least 1 hour before serving. This chilling time allows the flavors to meld together and helps the cake set for easy slicing and serving.
Notes
- Be sure to let the cake cool slightly before poking to prevent the cake from breaking apart.
- Use full-fat caramel sauce and sweetened condensed milk for the best rich flavor.
- For extra crunch, add more crushed Butterfinger bars on top before serving.
- This cake is best served chilled but can be stored in the refrigerator for up to 3 days.

