
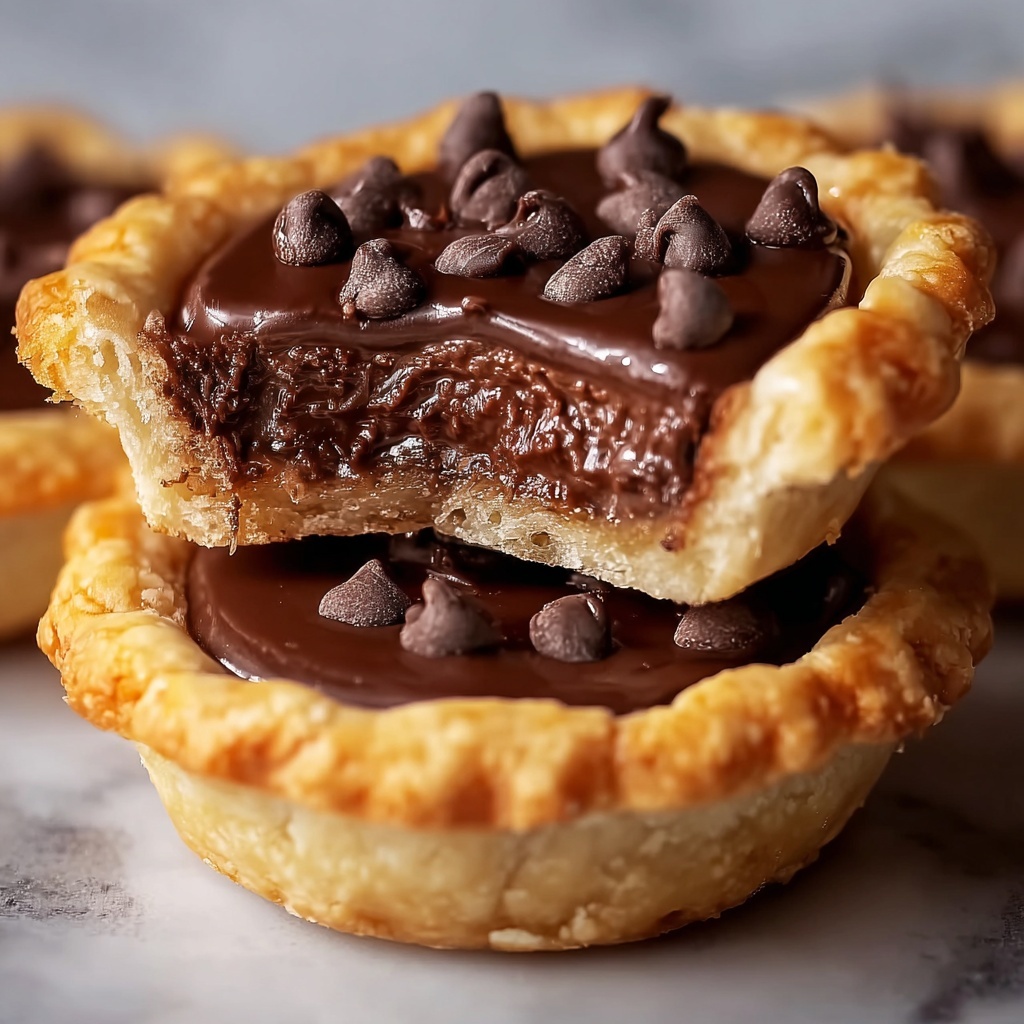
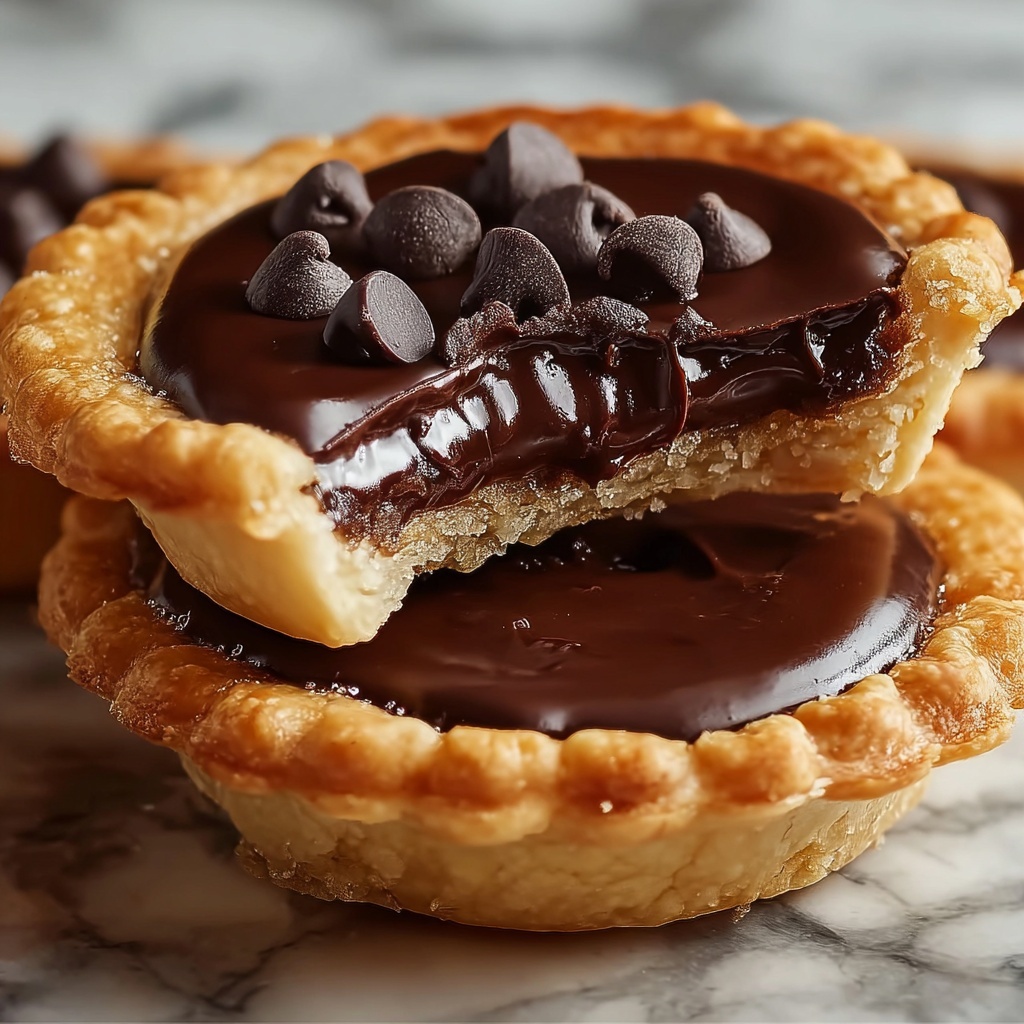
If you’ve ever dreamed of a melt-in-your-mouth treat that’s both nostalgic and indulgent, then this Chocolate-Filled Hand Pies Recipe might just become your new favorite. These charming little pastries pack a gooey, rich chocolate filling inside a flaky, golden crust that’s unbelievably satisfying. Whether you’re craving a quick dessert or want to impress guests with a homemade delight, this recipe combines simple ingredients for an unforgettable sweet bite that feels like a warm hug from the inside out.
Ingredients You’ll Need
Gathering the right ingredients is half the fun with this recipe, and the best part is how straightforward and pantry-friendly they are! Each component plays a starring role—flaky pie dough creates the perfect shell, semisweet chocolate brings that luscious richness, and a little cream adds a velvety texture that makes the filling irresistible.
- Refrigerated pie dough, 2 rounds or homemade equivalent: Provides a tender, flaky crust that’s easy to work with and bakes beautifully golden.
- Semisweet chocolate chips, 1 cup: Offers a balanced chocolate flavor that isn’t too bitter or overly sweet—perfect for melting.
- Heavy cream, 2 tablespoons: Adds creaminess to the chocolate filling for a smooth, luscious texture.
- Egg, 1 large (beaten for egg wash): Gives the crust a beautiful glossy finish and helps the pies turn that irresistible golden brown.
- Granulated sugar, 1 tablespoon (for sprinkling): Sprinkles a touch of sparkle and a subtle crunch on top of each pie.
- All-purpose flour (for dusting): Keeps your work surface and dough from sticking, making assembly a breeze.
How to Make Chocolate-Filled Hand Pies Recipe
Step 1: Prep Your Oven and Dough
Start by preheating your oven to 400 degrees Fahrenheit and lining a baking sheet with parchment paper to prevent sticking. Lightly dust your work surface with flour before unrolling the pie dough, which helps keep things neat and easy to handle.
Step 2: Cut the Dough Shapes
Cut each pie dough round into 4 or 5 circles or rectangles depending on your preferred shape—this is where your creativity can shine! Smaller pies make for the cutest handheld treats, while larger shapes feel extra indulgent.
Step 3: Make the Chocolate Filling
In a small bowl, combine the semisweet chocolate chips with the heavy cream. Microwave the mixture in 20-second bursts, stirring in between until the chocolate is smooth and melted. This quick step blends the flavors into a luscious filling you’ll want to savor.
Step 4: Assemble the Hand Pies
Place a spoonful of your silky chocolate filling right in the center of each dough piece. Brush the edges of the dough lightly with water to help seal, then carefully fold over to create a pocket. Press the edges firmly with a fork to crimp and secure every delicious bite inside.
Step 5: Prepare for Baking
Transfer the hand pies to your lined baking sheet. Brush each with the beaten egg to ensure a shiny, golden crust and sprinkle a little granulated sugar on top for an extra sparkly finish. Don’t forget to cut a tiny vent on the top of each pie so steam escapes while baking—this keeps them perfectly flaky.
Step 6: Bake to Perfection
Bake the pies for 12 to 15 minutes until they turn a gorgeous golden brown and the crust is delightfully flaky. Let them cool slightly before biting in so the warm chocolate sets just enough to give you that perfect ooey-gooey experience.
How to Serve Chocolate-Filled Hand Pies Recipe
Garnishes
Elevate your hand pies by dusting them lightly with powdered sugar or topping with a drizzle of chocolate or caramel sauce. Fresh berries like raspberries or strawberries add a lovely pop of color and a hint of tartness that complements the richness beautifully.
Side Dishes
These pies pair wonderfully with a scoop of vanilla ice cream or a dollop of whipped cream—both bring a cool contrast to the warm, melted chocolate inside. For a cozy touch, enjoy them alongside a cup of freshly brewed coffee or rich hot chocolate.
Creative Ways to Present
For a party, arrange the hand pies on a tiered dessert stand surrounded by edible flowers for a whimsical effect. You can also wrap individual pies in parchment paper tied with twine for charming take-home treats or picnic-friendly snacks.
Make Ahead and Storage
Storing Leftovers
Store any leftover hand pies in an airtight container at room temperature for up to two days. This keeps the crust crisp-ish and the chocolate soft, perfect for enjoying later without losing that fresh-baked magic.
Freezing
You can freeze unbaked hand pies by assembling them, placing them on a baking sheet, and freezing until solid. Then transfer to a freezer-safe bag. Bake directly from frozen—just add a few extra minutes to the baking time. This is a great way to have a quick dessert ready whenever a chocolate craving strikes!
Reheating
Reheat leftover pies in a toaster oven or regular oven at 350 degrees Fahrenheit for about 5 to 8 minutes to regain their flaky crunch and soften the chocolate filling. Avoid microwaving if you want to keep the crust crisp and delightful.
FAQs
Can I use homemade pie dough for this Chocolate-Filled Hand Pies Recipe?
Absolutely! Homemade dough will work wonderfully and adds a special homemade touch. Just make sure your dough is chilled and easy to handle when cutting and folding the pies.
What type of chocolate is best for the filling?
Semisweet chocolate chips are ideal because they balance sweetness and richness. You can also experiment with bittersweet or mixing in Nutella for extra smoothness, as suggested in the recipe notes.
Can I make these hand pies dairy-free or vegan?
Yes! Substitute dairy cream with coconut cream or a plant-based cream alternative, and use vegan dough and chocolate chips to make a delightful dairy-free version. The egg wash can be replaced with a plant milk and a bit of maple syrup for browning.
How long do these hand pies take to bake?
They bake quickly, about 12 to 15 minutes, until golden and flaky. Keep an eye on them since ovens vary, and you want a perfectly crisp crust without overbaking.
Can I prepare these pies ahead of time for a party?
Yes, you can prepare and freeze them in advance, then bake fresh just before serving. This makes entertaining stress-free and allows you to enjoy the party along with your guests!
Final Thoughts
There’s truly something magical about homemade treats that bring comfort and delight in every bite. I hope you’ll give this Chocolate-Filled Hand Pies Recipe a try—it’s easy, quick, and oh-so-rewarding to make. Share them with friends, savor them warm with your favorite accompaniments, and enjoy the happiness that comes with creating a little chocolate-filled joy in your kitchen.
Print
Chocolate-Filled Hand Pies Recipe
- Prep Time: 15 minutes
- Cook Time: 15 minutes
- Total Time: 30 minutes
- Yield: 8 to 10 hand pies
- Category: Dessert
- Method: Baking
- Cuisine: American
- Diet: Vegetarian
Description
Delightful chocolate-filled hand pies made with flaky pie dough and a rich, creamy chocolate filling. Perfect as an indulgent dessert or a sweet snack, these hand pies are easy to prepare and bake to golden perfection with a crisp crust and gooey chocolate center.
Ingredients
Dough
- Refrigerated pie dough, 2 rounds (or homemade equivalent)
- All-purpose flour for dusting
Filling
- Semisweet chocolate chips, 1 cup
- Heavy cream, 2 tablespoons
Finishing
- Egg, 1 large (beaten for egg wash)
- Granulated sugar, 1 tablespoon (for sprinkling)
Instructions
- Preheat Oven: Preheat the oven to 400°F (200°C) and line a baking sheet with parchment paper to prevent sticking and ease cleanup.
- Prepare Dough: Lightly flour your work surface and unroll the pie dough. Cut each round into 4 to 5 circles or rectangles, depending on your preferred shape for the hand pies.
- Make Chocolate Filling: In a small bowl, combine the semisweet chocolate chips and heavy cream. Microwave in 20-second intervals, stirring after each, until the chocolate is just melted and smooth.
- Assemble Hand Pies: Place a spoonful of the chocolate filling in the center of each dough piece. Lightly brush the edges with water to help seal them.
- Seal Pies: Fold the dough over the filling to form a pocket, then press the edges firmly with a fork to crimp and seal completely, preventing the filling from leaking during baking.
- Prepare for Baking: Transfer the assembled hand pies to the prepared baking sheet. Brush the tops with the beaten egg to promote browning and sprinkle lightly with granulated sugar for a sweet, crunchy finish. Use a small knife to cut a tiny vent on top of each pie to allow steam to escape.
- Bake: Bake in the preheated oven for 12 to 15 minutes, or until the pies are golden brown and flaky.
- Cool and Serve: Allow the hand pies to cool slightly so the chocolate filling can set before serving. Enjoy warm for the best experience.
Notes
- Replace half the chocolate chips with Nutella for an extra smooth and creamy filling.
- Serve warm with a scoop of ice cream for a richer dessert experience.
- Store leftovers in an airtight container and reheat gently in a toaster oven to retain crispness.


