
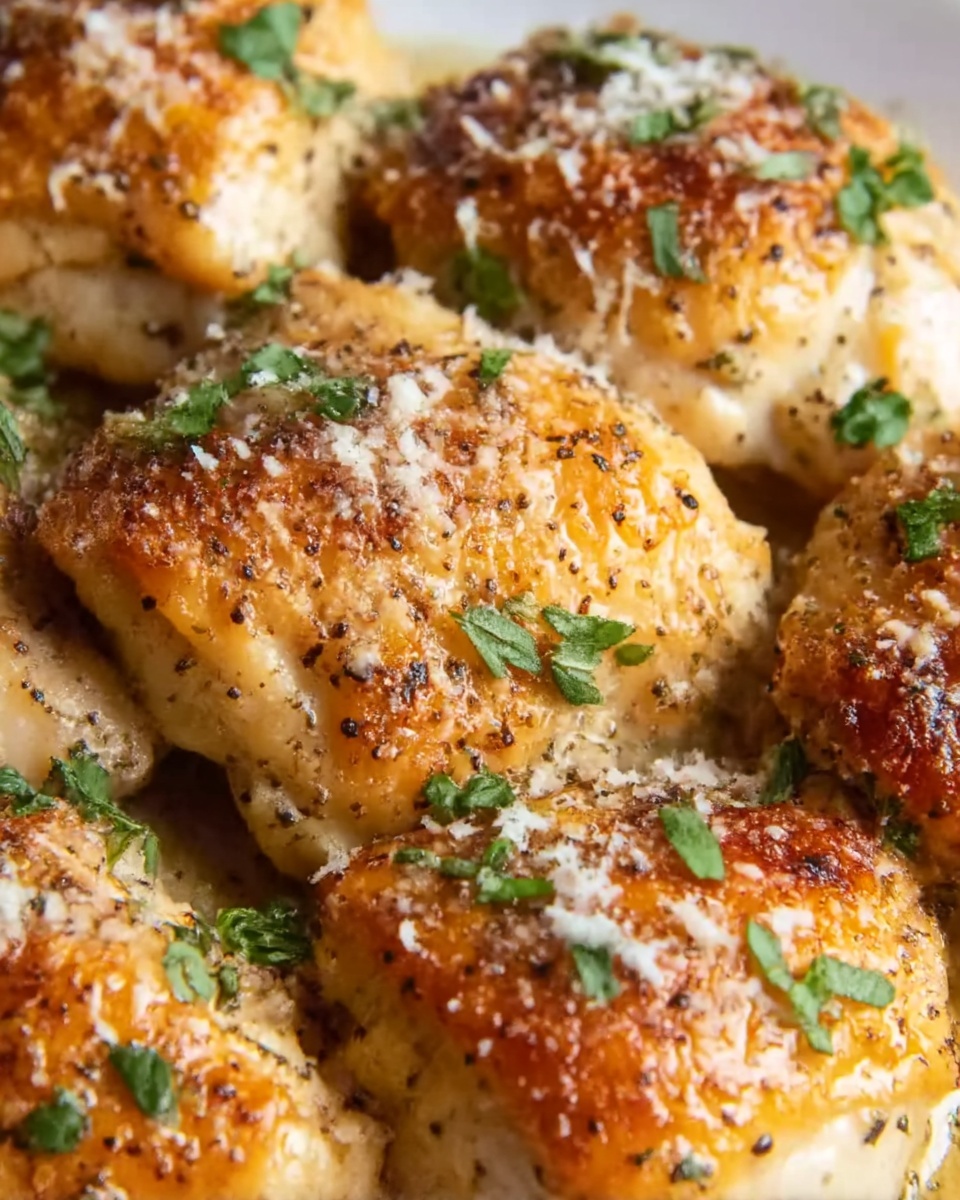
If you’re on the hunt for a dish that balances bold flavor with irresistible crunch, this Crispy Caesar Chicken Breasts Recipe is exactly what your dinner table needs. Imagine tender, juicy chicken breasts coated in a garlicky Caesar dressing, layered with Parmesan-packed panko breadcrumbs, then baked until gloriously golden and crispy. It’s a mouthwatering twist on classic Caesar salad flavors transformed into a hearty main course that’s both comforting and dazzling. Perfect for weeknight dinners or impressing guests, this recipe delivers crispy, savory satisfaction every single time.
Ingredients You’ll Need
The beauty of this Crispy Caesar Chicken Breasts Recipe lies in its simplicity and the impact of each ingredient. Every component is carefully chosen not only for flavor but also to build that beloved crispy texture and savory profile that makes this dish a standout.
- 4 boneless, skinless chicken breasts: The star of the show, providing juicy, lean protein that soaks up all the flavorful coatings.
- 1/2 cup Caesar dressing: Brings the classic tangy, creamy Caesar flavor that clings perfectly to the chicken.
- 1/4 cup Parmesan cheese, grated: Adds a nutty, salty depth and helps create a golden crust.
- 1 cup panko breadcrumbs: These Japanese-style breadcrumbs are lighter and crispier than regular ones, ensuring maximum crunch.
- 1 teaspoon garlic powder: Amplifies that signature garlic kick without overpowering the other flavors.
- 1 tablespoon olive oil: Helps the coating crisp up beautifully in the oven and adds richness.
- Zest of 1 lemon (optional): A bright, fresh citrus note that cuts through the richness for balance.
How to Make Crispy Caesar Chicken Breasts Recipe
Step 1: Preheat the Oven
Start by setting your oven to 400°F (200°C). This temperature is just right for cooking the chicken thoroughly while creating a perfectly crisp, golden crust. Prepare your baking sheet by lining it with parchment paper or giving it a light grease, which prevents sticking and keeps that crust intact.
Step 2: Prepare the Chicken
Patting the chicken breasts dry with paper towels might seem like a small step, but it’s essential. Removing excess moisture helps the Caesar dressing stick to the meat better and ensures your crispy coating doesn’t slide off during baking.
Step 3: Coat the Chicken
In a shallow dish, mix together the Caesar dressing and garlic powder for an extra layer of savory flavor. Dip each chicken breast into this mixture, making sure every inch is covered. Next, press the chicken into a mixture of panko breadcrumbs and grated Parmesan cheese, coating both sides generously. This combination is what delivers the signature crunchy crust packed with cheesy, garlicky goodness.
Step 4: Add Olive Oil
Place the coated chicken breasts on your prepared baking sheet. Drizzle olive oil evenly over the top — this step is crucial for helping the panko-Parmesan crust develop that beautiful golden color and satisfyingly crispy texture once baked.
Step 5: Bake the Chicken
Bake the chicken for 25 to 30 minutes until it reaches an internal temperature of 165°F (74°C). Keep an eye on the crust – you want it deeply golden and crunchy, which signals that your Crispy Caesar Chicken Breasts Recipe is ready to shine. The chicken inside should be tender and juicy, creating a perfect textural contrast.
Step 6: Optional Lemon Zest
Right before serving, sprinkle some fresh lemon zest over the chicken for a lively citrus spark. This bright addition effortlessly elevates the flavors and adds a burst of freshness that lightens the dish.
How to Serve Crispy Caesar Chicken Breasts Recipe

Garnishes
To really make your Crispy Caesar Chicken Breasts Recipe pop, consider fresh garnishes like chopped parsley or a few shavings of extra Parmesan cheese. A wedge of lemon on the side not only adds color but invites diners to add an extra zing of citrus tailored to their taste.
Side Dishes
This crispy chicken shines alongside a variety of sides. Crisp roasted vegetables or a fresh green salad with a light vinaigrette complement the richness. Creamy mashed potatoes or buttery pasta tossed with olive oil and garlic also pair beautifully with those Caesar-inspired flavors.
Creative Ways to Present
Looking to impress at your next dinner? Slice the chicken breasts thinly and serve them atop a classic Caesar salad for an elevated twist. You could also pile slices on toasted garlic bread for a delicious sandwich or serve with a small side of Caesar-dressed kale for extra nutrients and crunch.
Make Ahead and Storage
Storing Leftovers
Place any leftover chicken in an airtight container and refrigerate for up to 3 days. The crispy crust will soften slightly but the flavor remains just as delicious.
Freezing
If you want to save these for longer, wrap each cooled chicken breast tightly in plastic wrap, then place in a freezer-safe container or bag. Frozen, the chicken will keep for up to 2 months. When ready to enjoy, thaw overnight in the fridge before reheating.
Reheating
To revive the crispiness, reheat leftovers in an oven or air fryer at 350°F (175°C) for 10–15 minutes until warmed through and crusted back to life. Avoid microwaving if you want to keep the crunchy texture intact.
FAQs
Can I use chicken thighs instead of breasts?
Absolutely! Chicken thighs are juicier and can add extra flavor. Just be mindful of adjusting cooking time slightly as thighs may take longer to cook through.
Is there a substitute for Caesar dressing?
You can use a homemade or bottled version depending on your preference, but aim for one with that creamy, tangy base that includes anchovies or Worcestershire sauce for authenticity.
How do I get the coating extra crispy?
Use panko breadcrumbs as they are lighter and crisp up better than regular breadcrumbs. Also, don’t skip drizzling olive oil before baking—that helps achieve that golden crunch.
Can this recipe be made gluten-free?
Yes! Simply swap regular panko breadcrumbs with gluten-free panko alternatives to keep the texture without any gluten.
What’s the best way to check if chicken is fully cooked?
Use an instant-read meat thermometer to check for an internal temperature of 165°F (74°C). This ensures the chicken is safe to eat and perfectly juicy.
Final Thoughts
Once you try this Crispy Caesar Chicken Breasts Recipe, you’ll wonder why it isn’t a regular on your menu. It combines simplicity, bold Caesar flavors, and that unbeatable crispy texture you crave. Whether you’re cooking for family, friends, or just treating yourself, this recipe hits all the right notes and always leaves a lasting impression. Give it a go—you won’t regret it!
Print
Crispy Caesar Chicken Breasts Recipe
- Prep Time: 10 minutes
- Cook Time: 30 minutes
- Total Time: 40 minutes
- Yield: 4 servings
- Category: Main Course
- Method: Baking
- Cuisine: American
Description
Enjoy a deliciously crispy Caesar Chicken Breast recipe featuring boneless, skinless chicken coated in a savory blend of Caesar dressing, Parmesan cheese, and panko breadcrumbs, baked to golden perfection. This easy-to-make meal offers a flavorful twist on classic chicken with a crunchy crust and juicy inside, perfect for a family dinner or meal prep.
Ingredients
Chicken and Coating
- 4 boneless, skinless chicken breasts
- 1/2 cup Caesar dressing
- 1 cup panko breadcrumbs
- 1/4 cup Parmesan cheese, grated
- 1 teaspoon garlic powder
Additional Ingredients
- 1 tablespoon olive oil
- Zest of 1 lemon (optional, for a fresh citrusy note)
Instructions
- Preheat the Oven: Preheat your oven to 400°F (200°C). Line a baking sheet with parchment paper or lightly grease it to prevent sticking and aid in cleanup.
- Prepare the Chicken: Pat the chicken breasts dry with paper towels. Drying the surface ensures the coating adheres better to the chicken.
- Coat the Chicken: In a shallow dish, combine the Caesar dressing and garlic powder. Dip each chicken breast into this mixture, coating evenly. Then dip the chicken into a mixture of panko breadcrumbs and grated Parmesan cheese, pressing gently to cover both sides well.
- Add Olive Oil: Arrange the coated chicken breasts on the prepared baking sheet. Drizzle the olive oil evenly over the coated chicken to help create a crispy crust when baked.
- Bake the Chicken: Place the baking sheet in the preheated oven. Bake for 25-30 minutes, or until the chicken reaches an internal temperature of 165°F (74°C) and the coating is golden and crispy.
- Optional Lemon Zest: Before serving, sprinkle the chicken with lemon zest if desired. This adds a fresh, citrusy brightness that complements the savory flavors.
- Serve: Serve the crispy Caesar chicken breasts with your choice of sides such as steamed vegetables, pasta, or a green salad for a complete, satisfying meal.
Notes
- Ensure chicken breasts are of even thickness for consistent cooking.
- Use a meat thermometer to verify the internal temperature is 165°F for safe consumption.
- For extra crispiness, broil the chicken for the last 2 minutes—but watch closely to prevent burning.
- Lemon zest is optional but recommended to enhance flavor with a fresh note.
- Caesar dressing can be substituted with ranch or a homemade Caesar for different flavor profiles.


