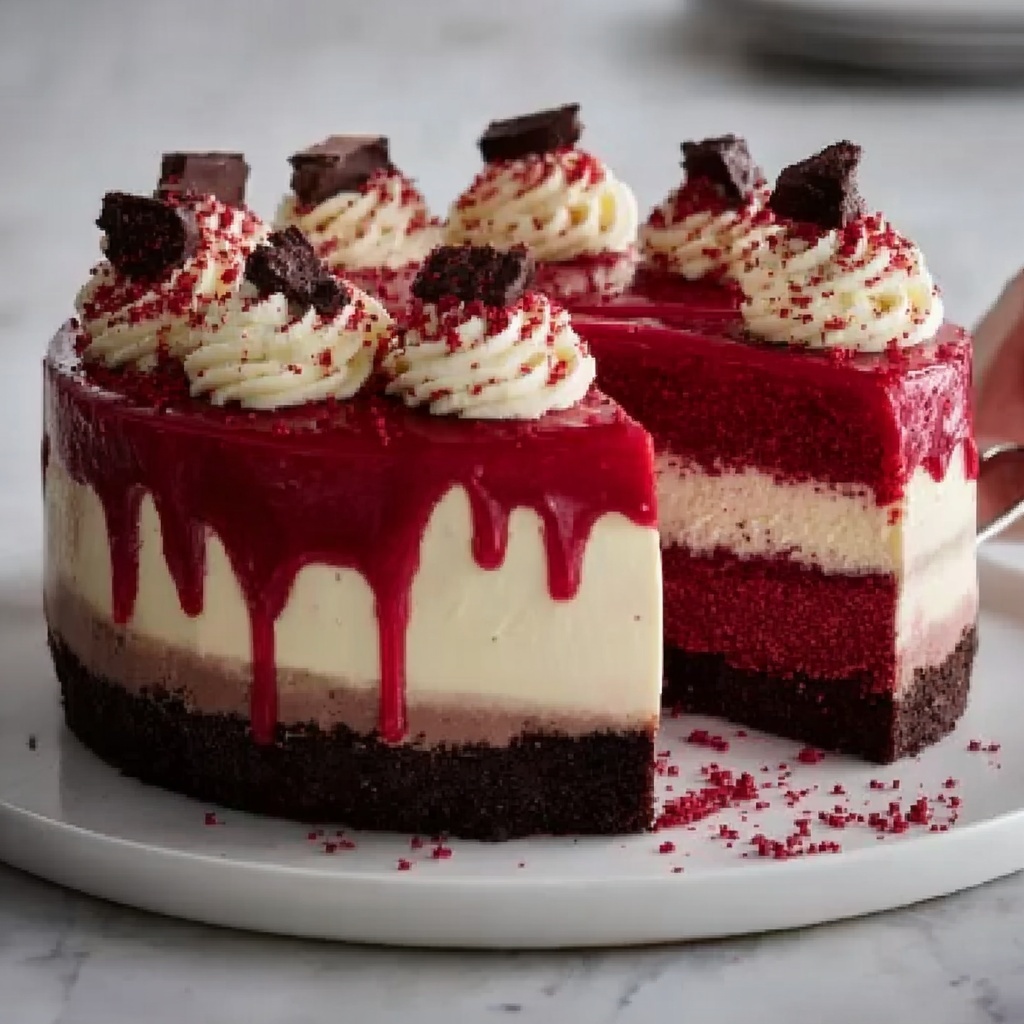
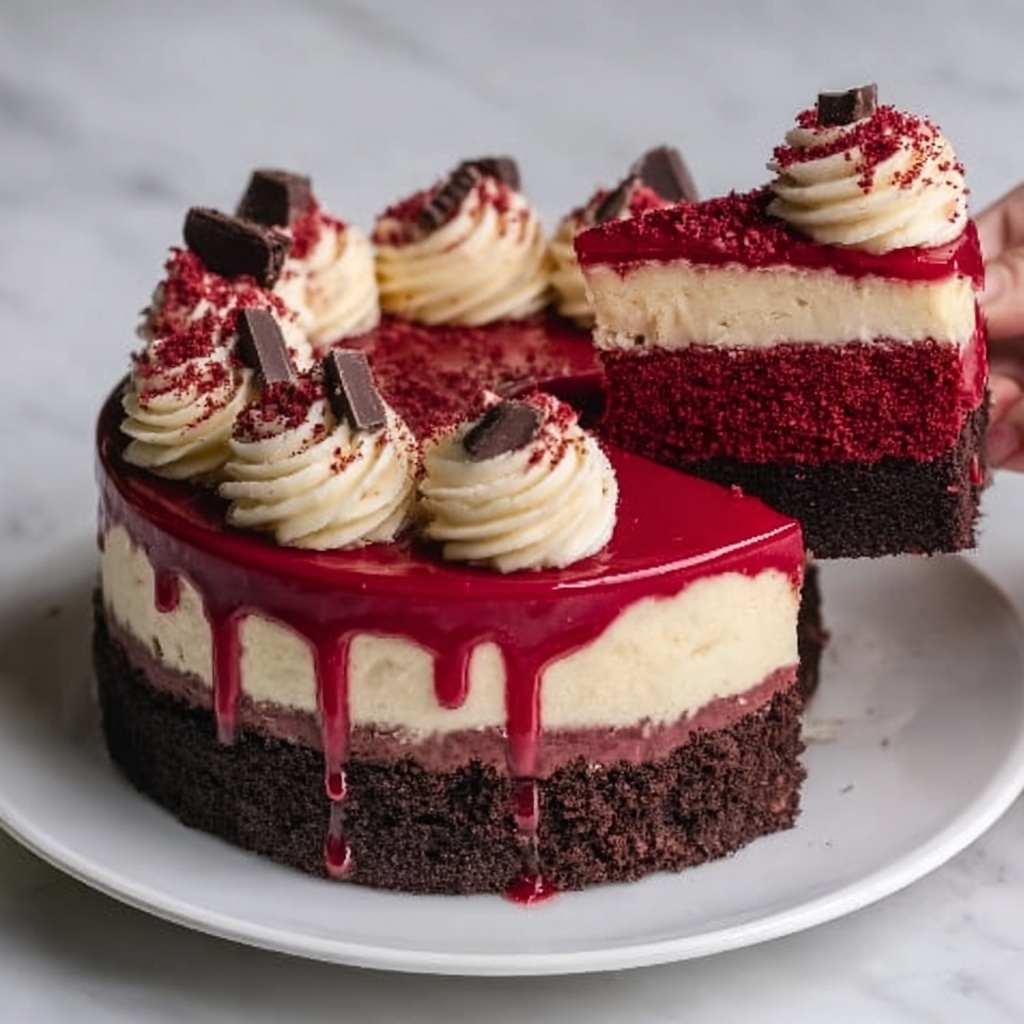
If you are craving something truly spectacular that brings together the rich flavors of a classic red velvet cake with the creamy indulgence of cheesecake, then this Decadent Red Velvet Cheesecake Layer Cake Recipe is your new go-to dessert. Picture luscious, velvety red layers hugging a smooth cheesecake filling, all wrapped up with a dreamy frosting—this cake is the ultimate showstopper for any occasion, guaranteed to impress and delight every bite lover in your life.
Ingredients You’ll Need
Keeping things simple yet special, the ingredients for this recipe combine pantry staples with a few luscious additions that create the perfect balance of flavor, texture, and that signature red hue. Each ingredient plays a vital role in crafting a cake that is moist, tangy, and beautifully rich.
- Red Velvet Cake Mix: The base brings that classic vibrant color and soft crumb, ready to be enhanced.
- Flour: Adds structure and helps achieve the perfect cake texture.
- Cocoa Powder: Gives a subtle chocolate undertone that complements the red velvet flavor perfectly.
- Baking Soda: Provides lift and lightness to the cake layers.
- Buttermilk: Adds moisture and a slight tang that balances the sweetness.
- Natural Red Food Coloring or Beet Juice: Gives that unmistakable red velvet color without artificial dyes.
- Cream Cheese: Essential for the rich cheesecake filling and frosting.
- Sour Cream: Keeps the cheesecake filling silky and moist.
- Greek Yogurt: A healthy twist to maintain creaminess while adding a subtle tang.
- Granulated Sugar: Sweetens both the cake and cheesecake layers perfectly.
- Eggs: Bind the ingredients and provide stability and richness.
- Vanilla Extract: Enhances all the flavors with a warm, aromatic note.
- Butter / Unsalted Butter / Plant-Based Butter Alternative: Adds tender crumb and depth to the cake layers and frosting.
How to Make Decadent Red Velvet Cheesecake Layer Cake Recipe
Step 1: Prepare Your Cake Pans and Batter
Start by preheating your oven to 350°F (175°C). Grease two 9-inch round cake pans and dust them lightly with flour—it helps the cakes release smoothly after baking. Then, mix your red velvet cake ingredients carefully, whether you’re using a mix or a homemade recipe. Be sure to blend everything just until combined to keep the cake light and fluffy.
Step 2: Bake the Cake Layers
Divide the batter evenly between your prepared pans and smooth the tops with a spatula so the cakes bake evenly. Pop them in the oven and bake for about 25-30 minutes, or until a toothpick inserted in the center comes out clean. Allow them to cool in the pans for 10 minutes before transferring to a wire rack to cool completely.
Step 3: Create the Cheesecake Filling
While your cakes cool, whip up the luscious cheesecake layer. Beat cream cheese until it’s silky smooth, then gradually mix in granulated sugar, sour cream or Greek yogurt, eggs, and vanilla extract. Once blended, pour this luscious filling into a greased 9-inch springform pan. Bake it at 325°F (160°C) for 50-60 minutes until slightly jiggly in the center, then leave it in the turned-off oven for an hour—this slow cooling keeps it beautifully crack-free.
Step 4: Chill the Cheesecake
After baking, chill your cheesecake in the refrigerator for at least 4 hours or ideally overnight. This step is crucial because it allows the cheesecake to firm up and become perfectly sliceable. Patience here ensures a flawless layer in your cake.
Step 5: Assemble the Cake
Once both the red velvet layers and cheesecake are completely cooled, level the tops of your cake layers with a serrated knife if they’ve domed while baking. Place one red velvet layer on a serving plate, spread a generous amount of cheesecake filling over it, and gently add the second cake layer on top. Press down lightly so the layers stick nicely together.
Step 6: Frost and Decorate
The finishing touch is all about frosting—it’s where cream cheese frosting or whipped cream comes in. Spread it evenly over the entire cake for a smooth, creamy exterior. For a stunning final look, sprinkle some red velvet crumbs or shave a little chocolate over the top. This Decadent Red Velvet Cheesecake Layer Cake Recipe will look as good as it tastes!
How to Serve Decadent Red Velvet Cheesecake Layer Cake Recipe

Garnishes
Adding garnishes not only boosts visual appeal but also layers in subtle flavor contrasts. Consider topping your cake with fresh berries, edible flowers, or a dusting of powdered sugar to complement the rich flavors without overpowering them.
Side Dishes
Pair this cake with light sides such as a fresh fruit salad or a scoop of vanilla bean ice cream. These sides balance the richness of the cake and keep your meal feeling bright and fresh.
Creative Ways to Present
Why not slice the cake into petite squares and serve on elegant mini plates at your next gathering? You can also layer individual servings in clear jars or glasses, alternating cake crumbs and cheesecake filling for a fun twist on the traditional presentation.
Make Ahead and Storage
Storing Leftovers
This cake keeps well in the refrigerator, tightly covered with plastic wrap or stored in an airtight container, for up to 4 days. The flavors actually meld and develop over time, so leftovers taste just as delightful!
Freezing
If you want to save some for later, wrap the cake securely in plastic wrap and foil, then freeze for up to 3 months. Thaw in the fridge overnight before serving to preserve its perfect texture.
Reheating
Since this is a chilled dessert, reheating is not recommended. Serve it straight from the fridge or allow it to sit at room temperature for 20 minutes for a softer, creamier bite.
FAQs
Can I make the cheesecake layer without a springform pan?
A springform pan is ideal for easy removal of the cheesecake without damaging it, but if you don’t have one, you can line a regular cake pan with parchment paper, allowing some overhang to lift the cheesecake out after baking.
Is there a dairy-free option for this recipe?
Absolutely! Use plant-based cream cheese, sour cream alternatives, and a plant-based butter substitute to make this cake suitable for dairy-free diets without compromising taste or texture.
Can I use homemade red velvet cake from scratch?
Definitely! Feel free to substitute the cake mix with your favorite from-scratch recipe. Just ensure it maintains that classic red velvet flavor and texture to complement the cheesecake filling perfectly.
How to prevent cracks in the cheesecake layer?
Slow cooling is key. After baking, keeping the cheesecake in the warm oven with the heat turned off helps avoid rapid temperature changes that cause cracks—plus, don’t overbake it; the center should remain slightly jiggly.
What frosting pairs best with this cake?
Classic cream cheese frosting is a match made in heaven with red velvet and cheesecake. For a lighter touch, whipped cream frosting or even a dusting of powdered sugar also works beautifully.
Final Thoughts
There’s something truly magical about combining the silky richness of cheesecake with the tender crumb and iconic flavor of red velvet cake. This Decadent Red Velvet Cheesecake Layer Cake Recipe is a celebration of textures and tastes that’s as impressive as it is delicious. I can’t wait for you to try it and experience the joyful reactions it brings to your table!
Print
Decadent Red Velvet Cheesecake Layer Cake Recipe
- Prep Time: 30 minutes
- Cook Time: 1 hour 30 minutes
- Total Time: 6 hours (including chilling)
- Yield: 12 servings
- Category: Dessert
- Method: Baking
- Cuisine: American
Description
This Decadent Red Velvet Cheesecake Layer Cake is a stunning dessert combining the rich, velvety flavors of classic red velvet cake with a creamy cheesecake center. Perfect for special occasions or impressing guests, this layered cake offers a harmonious balance of moist cake and smooth cheesecake, topped with luscious cream cheese frosting and decorative touches.
Ingredients
Red Velvet Cake
- 2 cups red velvet cake mix
- 1/4 cup all-purpose flour
- 2 tablespoons cocoa powder
- 1 teaspoon baking soda
- 1 cup buttermilk
- 1 tablespoon natural red food coloring or beet juice
- 2 large eggs
- 1/2 cup unsalted butter, melted
- 1 teaspoon vanilla extract
Cheesecake Filling
- 16 ounces cream cheese, softened
- 1/2 cup granulated sugar
- 1/2 cup sour cream or Greek yogurt
- 3 large eggs
- 1 teaspoon vanilla extract
- Butter or non-stick spray for greasing
Frosting and Decoration
- Cream cheese frosting or whipped cream (for frosting)
- Red velvet cake crumbs or chocolate shavings (for decoration)
Instructions
- Preheat and Prepare Cake Pans: Preheat your oven to 350°F (175°C). Grease and flour two 9-inch round cake pans to prevent the cakes from sticking.
- Make Red Velvet Cake Batter: In a large mixing bowl, combine the red velvet cake mix with flour, cocoa powder, baking soda, buttermilk, red food coloring, eggs, melted butter, and vanilla extract. Mix until just combined, taking care not to overmix to keep the cake tender.
- Divide and Bake Cake Layers: Pour the batter evenly into the prepared pans and smooth the tops with a spatula. Bake for 25-30 minutes or until a toothpick inserted in the center comes out clean. Allow the cakes to cool in the pans for 10 minutes before transferring to a wire rack to cool completely.
- Prepare Cheesecake Filling: While cakes cool, preheat oven to 325°F (160°C). In a medium bowl, beat softened cream cheese until smooth. Add sugar and mix until combined. Incorporate sour cream or Greek yogurt, eggs, and vanilla extract, beating until fully blended.
- Bake Cheesecake: Grease a 9-inch springform pan and pour in the cheesecake mixture. Bake for 50-60 minutes until the center is set but slightly jiggly. Turn off the oven and leave the cheesecake inside for an additional hour to cool gradually, reducing the risk of cracks.
- Chill Cheesecake: Remove cheesecake from the oven and chill in the refrigerator for at least 4 hours or preferably overnight to firm up completely.
- Assemble the Cake: Once both the cakes and cheesecake are fully cooled, level the tops of the red velvet layers with a serrated knife if needed. Place one red velvet layer on a serving plate, spread a generous layer of cheesecake over it, then top with the second red velvet layer. Press gently to adhere.
- Frost the Cake: Frost the entire assembled cake with cream cheese frosting or whipped cream according to preference.
- Decorate: Garnish with red velvet cake crumbs or chocolate shavings for an elegant finish, then refrigerate until ready to serve.
Notes
- Use natural red food coloring or beet juice for a healthier alternative to artificial dyes.
- Do not overmix the cake batter to retain a soft crumb.
- Slow cooling the cheesecake in the oven helps prevent cracking.
- Chill the cheesecake thoroughly before assembly for easier slicing.
- Store the assembled cake in the refrigerator and bring to room temperature before serving for best texture.

