
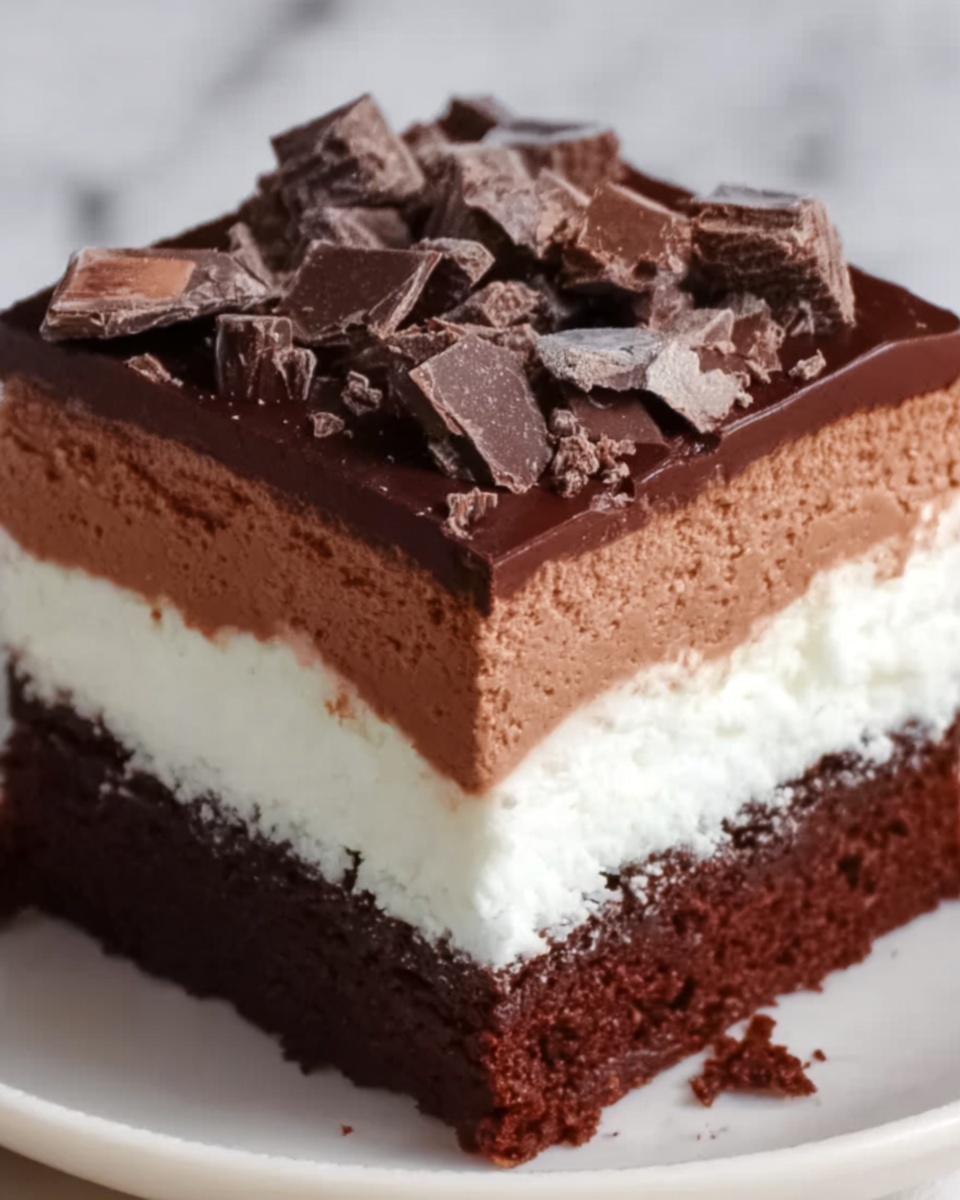
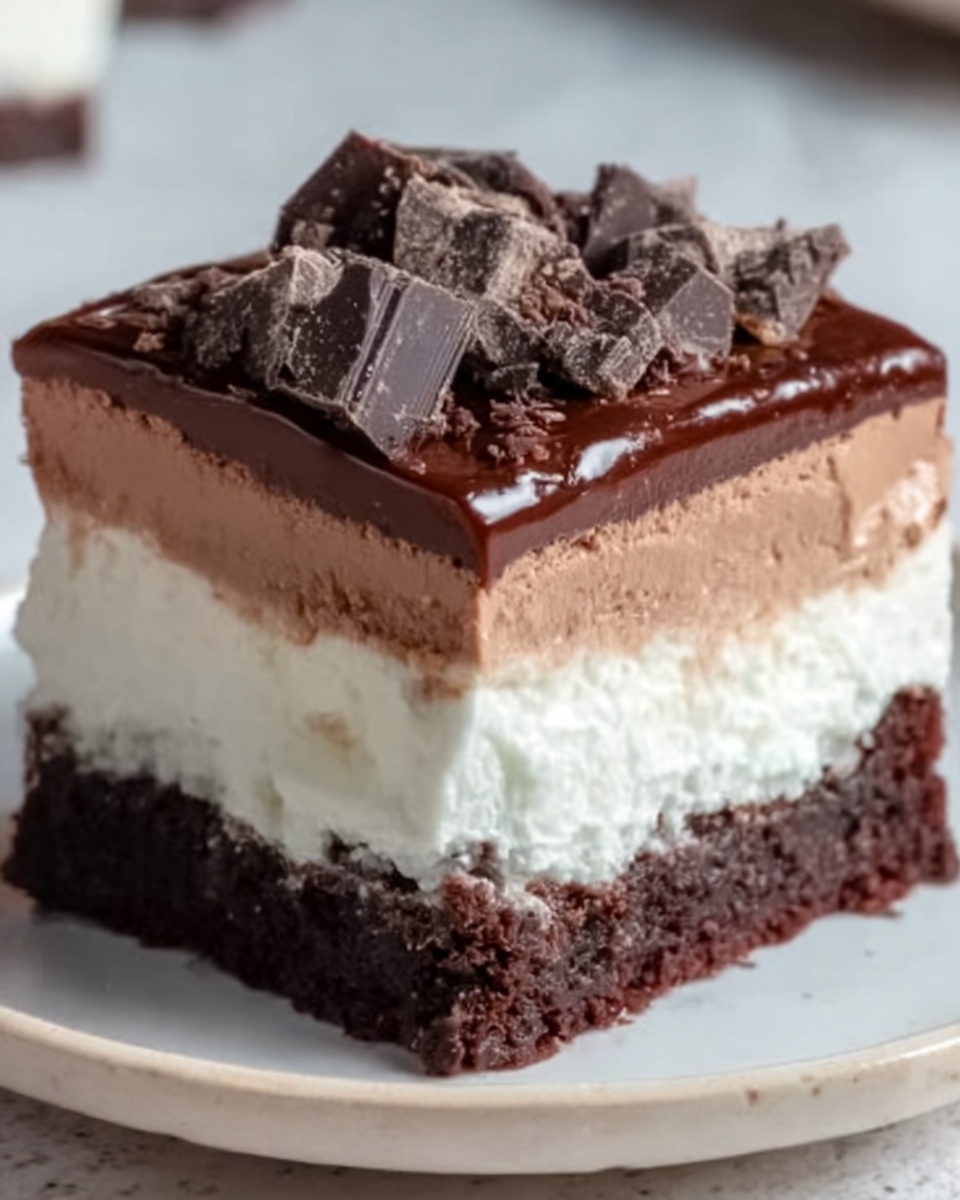
If you’re looking for a no-bake treat that’s rich, chewy, and irresistibly chocolatey, this Hot Chocolate Slice Recipe is an absolute game-changer. It brings together a crunchy biscuit base, a gooey marshmallow middle, and a silky dark chocolate topping for a dessert that’s both nostalgic and delightfully luxurious. Whether it’s for a family gathering or a cozy night in, this slice promises layers of flavor and texture that will have you coming back for more.
Ingredients You’ll Need
These ingredients are wonderfully simple yet each plays a crucial role in creating the perfect balance of taste, texture, and that gorgeous chocolate color. With pantry staples and a bit of love, you can bring this delicious treat to life.
- 1 1/2 cups crushed digestive biscuits (or graham crackers): This forms a crunchy and slightly sweet base that holds everything together.
- 1 cup desiccated coconut: Adds a subtle chewiness and a hint of natural sweetness to complement the cocoa.
- 1/2 cup cocoa powder: Provides that deep, rich chocolate flavor which is essential for a true hot chocolate vibe.
- 1/2 cup unsalted butter, melted: Binds the dry ingredients and adds velvety richness without overpowering the flavors.
- 1/2 cup sweetened condensed milk: Infuses sweetness and moisture, making the base deliciously soft.
- 1 teaspoon vanilla extract: Enhances the chocolate notes with warm, fragrant undertones.
- 1 cup mini marshmallows: Melts into a luscious, sticky layer that gives the slice its iconic gooey center.
- 1 tablespoon unsalted butter: Helps melt the marshmallows into a smooth, spreadable topping.
- 4 oz dark chocolate, chopped: For a glossy, decadent glaze packed with intense chocolate flavor.
- 2 tablespoons heavy cream: Lightens and smooths the chocolate glaze for that perfect silky finish.
How to Make Hot Chocolate Slice Recipe
Step 1: Prepare the biscuit base
Start by mixing the crushed digestive biscuits, desiccated coconut, and cocoa powder in a large bowl. This dry blend forms the heart of your base, setting the stage for a chocolaty, textured bite.
Step 2: Combine wet ingredients with dry
Next, pour in the melted butter, sweetened condensed milk, and vanilla extract. Stir gently but thoroughly until all crumbs are coated and the mixture feels slightly sticky. This binding step ensures your slice holds together without being crumbly.
Step 3: Press the base into your pan
Line a 9-inch square baking pan with parchment paper, then firmly press the biscuit mixture evenly across the base. Use the back of a spoon to smooth and compact the layer, which will give you a sturdy foundation for the gooey toppings.
Step 4: Chill until firm
Pop your pan into the fridge for at least one hour. This waiting time lets the base firm up nicely so it won’t crumble when you cut into the slice later on.
Step 5: Make the marshmallow topping
While your base is chilling, melt the butter in a small saucepan over low heat. Add the mini marshmallows and stir continuously until they’ve melted into a glossy, smooth mixture. Take care not to overheat, as burnt marshmallows can turn bitter.
Step 6: Spread marshmallows over chilled base
Allow the marshmallow topping to cool slightly, then pour it over your chilled biscuit base. Spread it gently and evenly, creating a soft, sticky layer that will soon set beautifully.
Step 7: Prepare the chocolate glaze
In a microwave-safe bowl, combine the chopped dark chocolate and heavy cream. Heat in short bursts of about 20 seconds, stirring well each time, until melted completely smooth. This simple yet luscious topping gives your slice that signature shiny finish.
Step 8: Pour and spread the chocolate glaze
Pour the warm chocolate glaze over the marshmallow layer, using a spatula to spread it evenly from edge to edge. This final layer adds a silky richness that contrasts perfectly with the chewy marshmallow and crunchy base.
Step 9: Chill until fully set
Return your slice to the fridge for at least two hours so everything can firm up properly. Patience here pays off with clean cuts and a perfectly balanced texture in every bite.
Step 10: Slice and enjoy!
Once the slice is firm, lift it from the pan using the parchment paper and cut it into 16 squares. Then, get ready to indulge in the gooey, chocolate-packed goodness of your very own Hot Chocolate Slice Recipe creation.
How to Serve Hot Chocolate Slice Recipe
Garnishes
To elevate your Hot Chocolate Slice Recipe even further, consider sprinkling a dusting of cocoa powder or shredded coconut on top. A few flakes of sea salt can also provide a wonderful contrast to the sweetness and help the chocolate pop.
Side Dishes
Serving this slice with a scoop of vanilla ice cream or a dollop of whipped cream can turn it into a decadent dessert experience. Fresh berries, like raspberries or strawberries, also pair beautifully by adding a bright, tangy element that balances the rich chocolate.
Creative Ways to Present
Try cutting the slice into bite-sized squares for a party platter, or layer pieces between parchment paper in a gift box for a handmade present. Another fun idea is to drizzle melted white chocolate over the top for a pretty contrast and extra wow factor.
Make Ahead and Storage
Storing Leftovers
Keep your Hot Chocolate Slice Recipe covered in an airtight container in the fridge to preserve freshness. It will stay perfectly delicious for up to 4 days, making it a great option for make-ahead entertaining or a sweet weekday snack.
Freezing
If you want to save some for later, freeze the slice squares in a sealed container separated by parchment paper. When well-wrapped, they can last up to 2 months in the freezer. Just thaw overnight in the fridge before enjoying.
Reheating
This slice is best served chilled or at room temperature, so reheating is generally not recommended. If you prefer a softer texture, leaving it out for 10-15 minutes will take the chill off and soften the chocolate without losing any of the slice’s amazing texture.
FAQs
Can I use a different type of biscuit?
Absolutely! While digestive biscuits or graham crackers are traditional for this recipe, you can experiment with other types like chocolate wafers or oat cookies to add your own twist in flavor and texture.
Is it possible to make this recipe dairy-free?
Yes, you can substitute the butter with a plant-based alternative and use coconut condensed milk. Ensure the chocolate you select is dairy-free to keep this dessert fully vegan-friendly.
How long does the Hot Chocolate Slice keep fresh?
Stored properly in the fridge, it stays fresh for about 4 days. Beyond that, the texture starts to change, so it’s best enjoyed sooner rather than later.
Can I add nuts or other mix-ins?
Definitely! Chopped nuts like hazelnuts or walnuts add a wonderful crunch, and you might also enjoy mixing in dried fruit for some sweet bursts. Just fold them into the base mixture before pressing it into the pan.
What’s the best way to cut these slices cleanly?
Use a sharp knife warmed briefly under hot water and then wiped dry. This prevents the chocolate from cracking and helps you slice the bars neatly without squashing the layers.
Final Thoughts
This Hot Chocolate Slice Recipe is a true crowd-pleaser that’s as fun to make as it is to eat. With its layers of texture and chocolatey goodness, it’s my go-to treat when I want something sweet but simple. Give it a try—you might just find your new favorite dessert that everyone will be asking for again and again.
Print
Hot Chocolate Slice Recipe
- Prep Time: 20 minutes
- Cook Time: 10 minutes
- Total Time: 3 hours 15 minutes
- Yield: 16 servings
- Category: Dessert
- Method: No-Cook
- Cuisine: International
Description
A decadent and no-bake dessert featuring a crunchy biscuit and coconut base, topped with a smooth layer of melted marshmallows and finished with a rich dark chocolate glaze. Perfectly chilled, this Hot Chocolate Slice is an indulgent treat ideal for sharing.
Ingredients
Base
- 1 1/2 cups crushed digestive biscuits (or graham crackers)
- 1 cup desiccated coconut
- 1/2 cup cocoa powder
- 1/2 cup unsalted butter, melted
- 1/2 cup sweetened condensed milk
- 1 teaspoon vanilla extract
Marshmallow Topping
- 1 cup mini marshmallows
- 1 tablespoon unsalted butter
Chocolate Glaze
- 4 oz dark chocolate, chopped
- 2 tablespoons heavy cream
Instructions
- Prepare the base: In a large mixing bowl, combine the crushed digestive biscuits, desiccated coconut, and cocoa powder thoroughly, ensuring an even mixture of dry ingredients.
- Mix wet ingredients: Add the melted butter, sweetened condensed milk, and vanilla extract to the dry mixture. Stir all components together until a uniformly combined mixture forms.
- Press base into pan: Line a 9-inch square baking pan with parchment paper. Transfer the base mixture into the pan and firmly press it down using the back of a spoon, smoothing and compacting it evenly across the bottom.
- Chill the base: Place the pan in the refrigerator and chill for at least 1 hour or until the base is firm and set.
- Prepare marshmallow topping: In a small saucepan over low heat, melt the tablespoon of unsalted butter. Once melted, add the mini marshmallows and stir continuously until completely melted and smooth in texture.
- Cool and spread marshmallow layer: Remove the marshmallow mixture from heat and let it cool for a few minutes. Then evenly spread it over the chilled biscuit base in the pan.
- Prepare the chocolate glaze: In a microwave-safe bowl, combine the chopped dark chocolate and heavy cream. Heat in 20-second intervals, stirring between each, until the chocolate is fully melted and the glaze is smooth.
- Top with chocolate glaze: Pour the melted chocolate glaze evenly over the marshmallow layer and spread gently with a spatula to cover the surface.
- Final chill: Return the pan to the fridge and chill for at least 2 hours or until the slice is fully set and firm to the touch.
- Serve: Once set, remove from the fridge, cut into 16 squares, and serve chilled. Enjoy your delicious Hot Chocolate Slice!
Notes
- For a nutty flavor, you can add chopped nuts to the base mixture.
- Use parchment paper to ensure easy removal of the slice from the pan.
- Store leftovers in an airtight container in the fridge for up to 5 days.
- You can substitute dark chocolate with milk chocolate for a sweeter glaze.
- Allow the marshmallow mixture to cool slightly before spreading to avoid melting the base.


