
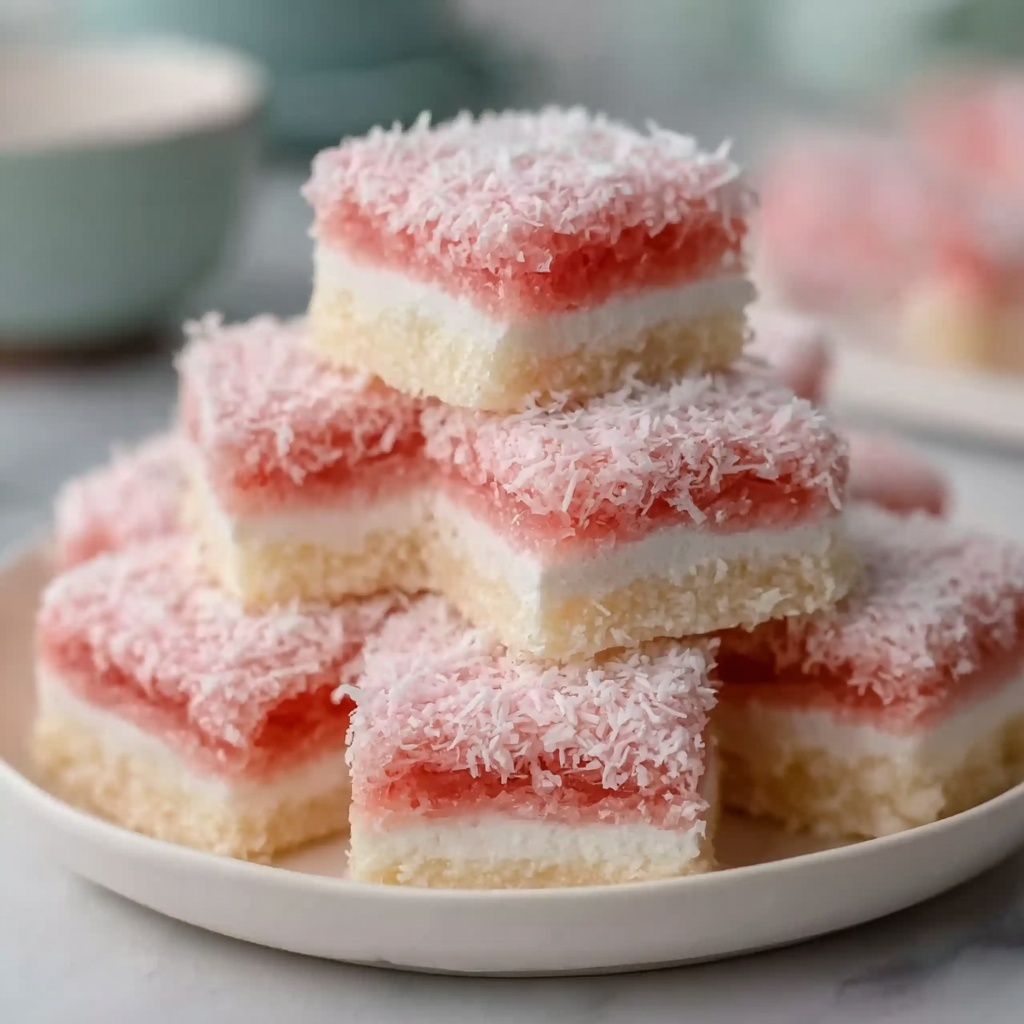
If you’re craving a nostalgic treat that bursts with rosy sweetness and charming texture, then this Old-Fashioned Pink Jelly Cake Recipe will be your new best friend in the kitchen. It’s a delightful walk down memory lane, combining soft, fluffy little cakes dipped lovingly in glistening pink jelly, rolled in coconut, and sandwiched with whipped cream. Every bite offers a perfect balance of lightness, fruity flavor, and that classic homemade feel that makes this dessert utterly irresistible.
Ingredients You’ll Need
This recipe shines because of its simplicity and how each ingredient plays a vital role in the final masterpiece. From the buttery softness of the cake to the vibrant pink hue of the jelly and the coconut’s delicate crunch, every element comes together in harmony to create a dessert that’s as lovely to look at as it is to eat.
- 80g butter, softened: Provides richness and tenderness to the cake base.
- 1/2 cup (110g) caster sugar: Sweetens the batter evenly without graininess.
- 1 tsp vanilla extract: Adds warmth and depth to the flavor.
- 1 egg: Binds ingredients and helps achieve a light texture.
- 2/3 cup (160g) milk: Keeps the batter moist and smooth.
- 1 cup (130g) self-raising flour, sifted: Provides the soft structure needed for fluffy cakes.
- 85g packet strawberry jelly crystals: Creates the iconic pink jelly coating, bursting with fruity flavor.
- 1 cup (240g) boiling water: Used to dissolve the jelly crystals for a smooth mixture.
- 1 cup (240g) cold water: Adds to the jelly to achieve the perfect consistency for dipping.
- 3 1/2 cups (280g) desiccated coconut: Offers a contrasting texture and a lovely tropical aroma.
- 1 cup (240g) whipped cream: The dreamy filling that holds the jelly cakes together.
How to Make Old-Fashioned Pink Jelly Cake Recipe
Step 1: Prepare Your Oven and Tins
Start by preheating your oven to 175°C, fan-forced, and lightly grease two 12-hole patty-pan tins. This ensures your cakes come out easily and bake evenly, setting the stage for a perfect batch every time.
Step 2: Make the Cake Batter
In a large bowl, cream together the softened butter, caster sugar, and vanilla extract until the mixture is pale and fluffy—that airy texture is key to a light cake. Next, add the egg and beat well until completely combined. Then gently fold in the milk and sifted self-raising flour in two batches, alternating between the two. This careful folding keeps the batter airy and smooth, guaranteeing soft, tender cakes.
Step 3: Bake the Little Cakes
Spoon the batter into each patty-pan hole, filling just below the top to allow room for rising. Pop the trays in the oven and bake for about 15 to 18 minutes until golden and a skewer inserted in the middle comes out clean. Once baked, let the cakes cool in the tins for 5 minutes before transferring them to a wire rack to cool completely.
Step 4: Prepare the Strawberry Jelly
While the cakes cool, dissolve the strawberry jelly crystals in boiling water, then stir in cold water for the perfect consistency. Pop this in the fridge and let it chill until it becomes partially set—this generally takes 1 to 2 hours and ensures the jelly will cling beautifully to the cakes without slipping off.
Step 5: Dip, Coat, and Assemble
Using a slotted spoon, dip each cooled cake into the partially set jelly, letting the excess drip off for a thin, glistening coating. Immediately roll each cake in desiccated coconut, which adds that delightful texture contrast and a charming rustic look. Finally, spoon whipped cream onto one of the cakes and gently sandwich it with another, creating that classic jelly cream pairing. Refrigerate your assembled cakes for at least 30 minutes so everything sets nicely together.
How to Serve Old-Fashioned Pink Jelly Cake Recipe

Garnishes
To elevate your Old-Fashioned Pink Jelly Cake Recipe presentation, try adding fresh strawberries on the side or a sprinkle of edible rose petals for a romantic touch. A light dusting of icing sugar can also add a snowy, elegant look that highlights the cake’s soft pink tones beautifully.
Side Dishes
This jelly cake pairs wonderfully with fresh berry salads or a tangy citrus sorbet to complement its sweet, creamy layers. A cup of strong black tea or a gently brewed fruity tea is also a perfect beverage to serve alongside, balancing the richness while keeping the experience refreshingly light.
Creative Ways to Present
Why not create a stunning platter with each jelly cake individually placed in mini paper cupcake liners? You could also serve them on a vintage cake stand for an authentic old-fashioned vibe. For parties, stacking the cakes in a pyramid shape or lining them up on a pretty tray with scattered coconut flakes around adds an inviting and playful look.
Make Ahead and Storage
Storing Leftovers
Your leftover Old-Fashioned Pink Jelly Cake Recipe treats can be stored in an airtight container in the refrigerator for up to 3 days. Keeping them chilled preserves the jelly coating and whipped cream, ensuring they stay fresh and just as delightful as when freshly made.
Freezing
While freezing is possible, it’s best to freeze the cakes before assembling with whipped cream and jelly for optimum texture. Wrap cooled cakes tightly in plastic wrap, then place them in an airtight container or freezer bag for up to 1 month. Defrost overnight in the fridge before dipping in jelly and assembling as directed.
Reheating
This dessert is best enjoyed chilled, so reheating is not recommended as it affects the jelly and cream’s texture. If you want a softer cake, allow it to sit at room temperature for 10 to 15 minutes before serving to take the chill off without compromising the overall experience.
FAQs
Can I use different flavors of jelly in this recipe?
Absolutely! While strawberry jelly is classic, you can experiment with raspberry, cherry, or even lime jelly to create fun new twists on the Old-Fashioned Pink Jelly Cake Recipe. Just make sure the jelly sets well enough to coat the cakes.
What can I substitute for desiccated coconut?
If you’re not a coconut fan, finely crushed graham crackers or toasted white chocolate shavings make tasty alternatives, offering a different texture but still providing that finished touch to the jelly coating.
Is it possible to make these cakes gluten-free?
Definitely! Use a gluten-free self-raising flour blend to replace the regular flour, and be sure all other ingredients are gluten-free. The rest of the process stays the same, giving you a delightful gluten-free Old-Fashioned Pink Jelly Cake Recipe.
How long does it take for the jelly to partially set?
The jelly should be refrigerated for about 1 to 2 hours until it reaches a thick but still dippable consistency. This stage is essential for the jelly to cling perfectly to the cakes without dripping off.
Can I use store-bought whipped cream?
Yes, store-bought whipped cream works fine if you’re short on time. For the best flavor and texture, however, freshly whipped cream is recommended—it’s lighter, tastes fresher, and holds the sandwich together more elegantly.
Final Thoughts
There’s something truly magical about an Old-Fashioned Pink Jelly Cake Recipe that captures the heart and taste buds alike. Whether you’re treating yourself or surprising friends at a gathering, this recipe is a charming way to add sweetness and nostalgia to your day. So, gather those simple ingredients, roll up your sleeves, and get ready to enjoy a delightful bite of history with each lovingly made pink jelly cake.
Print
Old-Fashioned Pink Jelly Cake Recipe
- Prep Time: 20 minutes
- Cook Time: 18 minutes
- Total Time: 1 hour 30 minutes
- Yield: 12 servings
- Category: Dessert
- Method: Baking
- Cuisine: Australian
Description
This Old-Fashioned Pink Jelly Cake is a nostalgic and delightful treat featuring soft sponge cakes dipped in strawberry-flavored jelly, rolled in coconut, and sandwiched with whipped cream. It’s a light and sweet dessert perfect for gatherings, blending classic ingredients and simple techniques.
Ingredients
Cake
- 80g butter, softened
- 1/2 cup (110g) caster sugar
- 1 tsp vanilla extract
- 1 egg
- 2/3 cup (160g) milk
- 1 cup (130g) self-raising flour, sifted
Jelly Coating
- 85g packet strawberry jelly crystals
- 1 cup (240g) boiling water
- 1 cup (240g) cold water
Coating and Assembly
- 3 1/2 cups (280g) desiccated coconut
- 1 cup (240g) whipped cream
Instructions
- Preheat Oven: Preheat your oven to 175°C (fan-forced) to ensure it’s ready for baking the sponge cakes.
- Grease Tins: Lightly grease two 12-hole patty-pan tins to prevent sticking and allow easy removal of cakes.
- Cream Butter and Sugar: In a large bowl, cream together the softened butter, caster sugar, and vanilla extract until the mixture is pale and fluffy, creating a light base for the batter.
- Add Egg: Beat in the egg until it is fully incorporated, ensuring the batter is even.
- Fold in Milk and Flour: Gently fold in the milk and sifted self-raising flour alternately in two batches. This careful folding maintains the batter’s airiness for a tender cake.
- Fill Patty-Pans: Spoon the batter into the prepared patty-pan holes, filling each just below the top to allow for rising.
- Bake: Bake the cakes for 15–18 minutes or until golden brown. Test doneness by inserting a skewer; it should come out clean.
- Cool Cakes: Allow the cakes to cool in the tin for 5 minutes, then transfer them to a wire rack to cool completely, preventing sogginess and preserving texture.
- Make Jelly Mixture: Dissolve the strawberry jelly crystals in boiling water, stir in the cold water, then refrigerate until the mixture is partially set, about 1–2 hours, to a syrupy consistency for dipping.
- Dip Cakes in Jelly: Using a slotted spoon, dip each cooled cake into the jelly mixture, letting excess drip off to ensure a thin, even coating.
- Roll in Coconut: Roll each jelly-coated cake in desiccated coconut, giving a textured and flavorful outer layer.
- Assemble Cakes: Spoon whipped cream onto one half of the cakes, then sandwich with another half to create the final assembled treat.
- Chill Before Serving: Refrigerate the assembled cakes for 30 minutes before serving to let the jelly set and the cream firm up for the best texture and flavor.
Notes
- Ensure the jelly mixture is only partially set before dipping; if too liquid, the jelly won’t coat well, if too firm, it won’t stick properly.
- You can substitute whipped cream with a stabilized cream or mascarpone for a richer taste.
- Store assembled cakes in the refrigerator and consume within 2 days for optimal freshness.
- Use fresh desiccated coconut or toast it lightly for extra flavor if desired.


