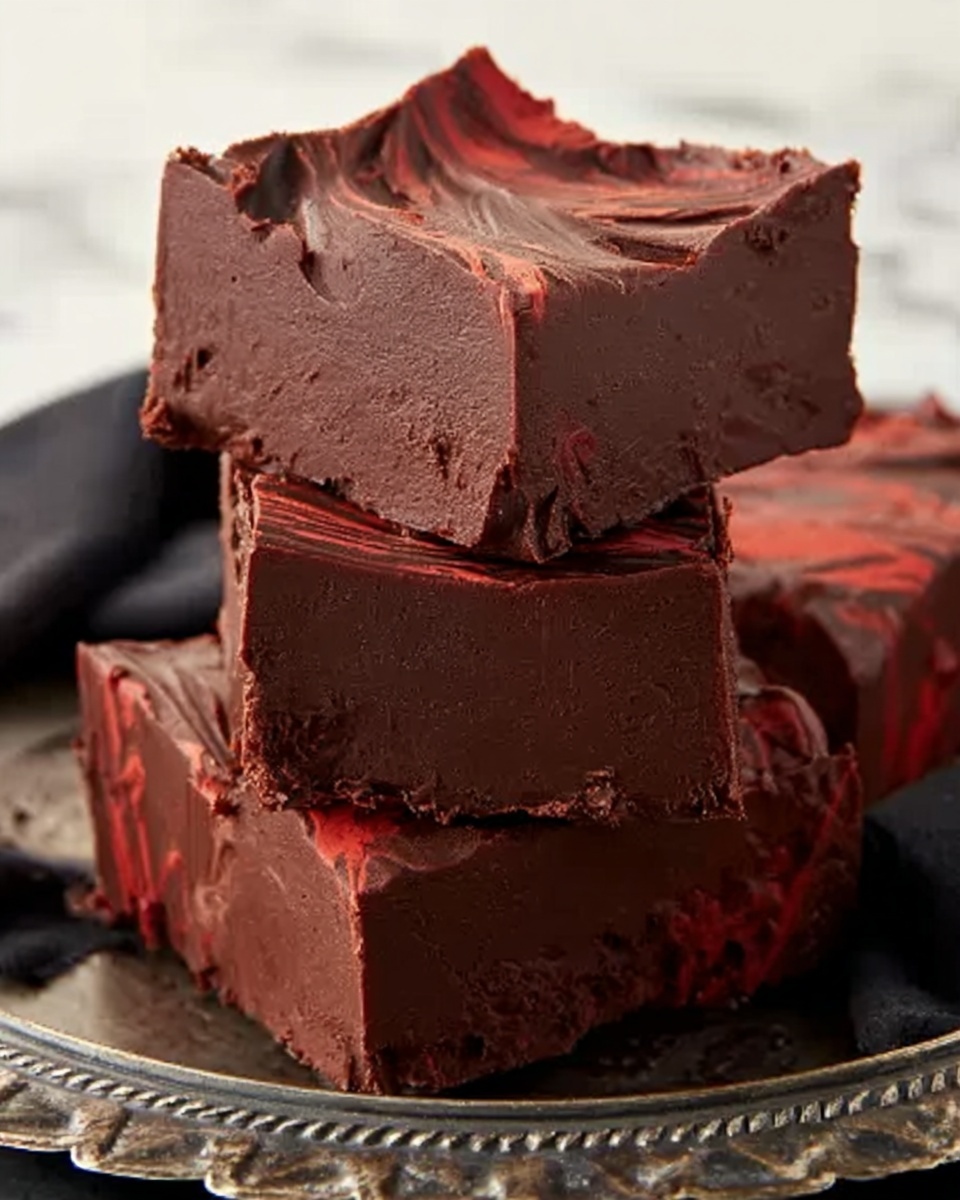
There’s something utterly magical about this Vampire Fudge Recipe that makes it a standout treat for any occasion, especially when you want to impress with something both spooky and delicious. This decadent, two-layer fudge combines rich cocoa-infused chocolate with a vibrant red fudge that looks like it’s filled with a vampiric blood-red swirl, making it as much a feast for the eyes as it is for your taste buds. Whether you’re preparing for a Halloween party or just craving a uniquely striking dessert, this Vampire Fudge Recipe is guaranteed to steal the show and become a fast favorite.

Ingredients You’ll Need
The beauty of this Vampire Fudge Recipe is how it merges simple, classic ingredients that come together perfectly to create contrasting layers of flavor and color. Each element plays a crucial role in the texture and stunning visual appeal of the fudge, from the smoothness of white chocolate to the richness of cocoa and the striking pop of red food coloring.
- White chocolate chips: Providing a creamy base, they melt down beautifully for smooth fudge layers.
- Sweetened condensed milk: Adds sweetness and moistness, helping the fudge set with the perfect texture.
- Red food coloring: Essential for that unforgettable vampire-inspired vibrant red layer.
- Vanilla extract: Enhances the overall flavor depth with a sweet aromatic touch.
- Cocoa powder: Gives the chocolate layer rich depth and slight bitterness to balance the sweetness.
- Butter: Adds creaminess and helps achieve that luscious smooth fudge feel.
- Black food coloring (optional): Intensifies the darkness of the chocolate layer for a more dramatic effect.
How to Make Vampire Fudge Recipe
Step 1: Prepare the Pan
Begin by lining an 8×8-inch baking pan with parchment paper, leaving some overhang on the sides. This clever trick makes it super easy to lift the fudge out later on without any sticking mishaps, so your perfectly crafted layers will stay intact.
Step 2: Make the Chocolate Layer
In a medium saucepan, combine 1 1/2 cups of white chocolate chips, half a can of sweetened condensed milk, cocoa powder, and butter over low heat. Stir gently and patiently until everything is melted and the mixture becomes impressively smooth. This is when you can stir in black food coloring if you want that extra dark, mysterious vibe. Pour this luscious chocolate mixture into your prepared pan and spread it out evenly. Pop it into the fridge for about 10 minutes so it can start setting nicely.
Step 3: Make the Red Fudge Layer
Next, melt the remaining white chocolate chips with the other half of the sweetened condensed milk in a separate saucepan, keeping the heat low to avoid burning. Stir until silky smooth, then add vanilla extract for a warm undertone and red food coloring little by little, until you reach that iconic blood-red hue you’re after. This layer is what gives the Vampire Fudge Recipe its spectacular flair and festive spirit.
Step 4: Assemble the Fudge
Pour the red fudge mixture over the now-chilled chocolate layer, gently spreading it so every corner is covered. For a show-stopping finish, grab a toothpick and swirl the two layers together lightly for a marbled effect that looks both elegant and delightfully spooky.
Step 5: Chill and Serve
Refrigerate the entire pan for at least two hours to let your Vampire Fudge Recipe fully set and firm up. When ready, use the parchment overhang to lift the fudge out and slice it into 16 generous squares, perfect for sharing or savoring bit by bit.
How to Serve Vampire Fudge Recipe

Garnishes
To heighten the Vampire Fudge Recipe’s dramatic flair, sprinkle a few edible silver stars, red sugar crystals, or even tiny edible spider decorations on top just before serving. These little touches make the fudge extra festive and irresistible, especially for themed parties.
Side Dishes
This fudge pairs wonderfully with a light, tart fruit salad or fresh berries to balance the richness. For an indulgent pairing, try it alongside a scoop of vanilla bean ice cream or a cup of robust coffee to cut through the sweetness.
Creative Ways to Present
Serving your Vampire Fudge Recipe on a dark slate platter or a vintage silver tray amplifies the spooky aesthetic. You could also cut the fudge into fang-shaped pieces using a sharp knife or cookie cutters to make it even more thematic and fun for guests of all ages.
Make Ahead and Storage
Storing Leftovers
Leftover Vampire Fudge Recipe can be stored in an airtight container at room temperature for up to 3 days, or refrigerated if you prefer a firmer texture. Just make sure it’s sealed well to keep the chocolate layers from drying out or absorbing other flavors.
Freezing
If you want to make this Vampire Fudge Recipe ahead of time, it freezes beautifully. Wrap the fudge tightly in plastic wrap, then place it in a freezer-safe container or bag. It can be frozen for up to 2 months. When you’re ready to enjoy it, thaw overnight in the refrigerator.
Reheating
While fudge generally doesn’t require reheating, if you prefer a softer texture, simply let pieces sit at room temperature for 15 to 20 minutes before serving. Avoid microwaving as it may cause the fudge to separate or lose its smooth consistency.
FAQs
Can I use dark chocolate instead of white chocolate?
While the classic Vampire Fudge Recipe relies on white chocolate for its creamy layers and vibrant red color, you can experiment with dark chocolate, but the red fudge layer’s color won’t be as bright. Mixing some white and dark chocolate might also create interesting flavor notes.
How can I get the red food coloring color to be more intense?
For a deeper red, use gel or paste food coloring instead of liquid—it’s more concentrated and won’t add extra moisture to your fudge. Gradually add the food coloring until you reach the perfect blood-red shade you desire for your Vampire Fudge Recipe.
Can I make this recipe vegan or dairy-free?
Substituting dairy ingredients like butter and sweetened condensed milk can be tricky, but you can try plant-based butter and coconut condensed milk alternatives. Keep in mind that texture and flavor may vary slightly, so a test batch is recommended if you want to adapt the Vampire Fudge Recipe for special diets.
What’s the best way to cut the fudge without it crumbling?
Use a sharp knife warmed under hot water and wiped dry between cuts for clean, smooth slices. Letting the fudge come to room temperature for 10 minutes before cutting can also help avoid cracking or crumbling.
Can I add other flavors or mix-ins?
Absolutely! While the original Vampire Fudge Recipe is stunning on its own, feel free to sprinkle in chopped nuts, dried cherries, or even mini marshmallows into the layers for extra texture and flavor surprises.
Final Thoughts
This Vampire Fudge Recipe isn’t just a treat; it’s a conversation starter and a showstopper in one. Its irresistible creamy texture combined with a dramatic twist of red and dark layers makes it perfect for celebrations or simply indulging your sweet tooth. I can’t wait for you to try it out and watch your friends’ eyes light up as they discover this deliciously eerie delight!
Print
Vampire Fudge Recipe
- Prep Time: 20 minutes
- Cook Time: 10 minutes
- Total Time: 2 hours 30 minutes
- Yield: 16 servings
- Category: Dessert
- Method: Stovetop
- Cuisine: American
- Diet: Vegetarian
Description
Vampire Fudge is a rich, two-layered treat featuring a dark chocolate base and a vibrant red white chocolate topping, perfect for Halloween or any festive occasion. The fudge combines creamy white chocolate with cocoa and sweetened condensed milk, accented with red and black food coloring to create striking, marbled layers that are as delicious as they are visually impressive.
Ingredients
Chocolate Layer
- 1 1/2 cups white chocolate chips
- 1/2 can (7 oz) sweetened condensed milk
- 1/4 cup cocoa powder
- 2 tablespoons butter
- 1/2 teaspoon black food coloring (optional)
Red Fudge Layer
- 1 1/2 cups white chocolate chips
- 1/2 can (7 oz) sweetened condensed milk
- 1 teaspoon vanilla extract
- Red food coloring, to desired shade
Instructions
- Prepare the Pan: Line an 8×8-inch baking pan with parchment paper, leaving overhang on the sides to easily lift the fudge out later.
- Make the Chocolate Layer: In a medium saucepan over low heat, combine 1 1/2 cups white chocolate chips, 1/2 can sweetened condensed milk, cocoa powder, and butter. Stir continuously until the mixture is smooth and fully combined. If desired, stir in black food coloring for a darker chocolate layer. Pour this mixture evenly into the prepared pan and chill in the refrigerator for about 10 minutes to set slightly.
- Make the Red Fudge Layer: In another saucepan over low heat, melt the remaining 1 1/2 cups white chocolate chips with 1/2 can sweetened condensed milk, stirring constantly until smooth. Remove from heat and stir in vanilla extract. Add red food coloring gradually until you achieve your desired vibrant red color.
- Assemble the Fudge: Pour the red fudge mixture over the set chocolate layer in the pan. For a marbled effect, optionally use a toothpick to swirl the two layers together gently.
- Chill and Serve: Refrigerate the assembled fudge for at least 2 hours or until fully set. Once firm, lift the fudge out of the pan using the parchment paper overhang and cut into 16 squares. Serve chilled.
Notes
- Ensure you melt the chocolate gently over low heat to avoid burning or seizing.
- Use parchment paper with overhang for easy removal of the fudge from the pan.
- The black food coloring in the chocolate layer is optional but adds a deeper, dramatic color perfect for the theme.
- For a more intense red color, add food coloring a few drops at a time until you reach your desired shade.
- Store leftovers in an airtight container in the refrigerator for up to one week.


